@Service(SimpleService.class)
public class SimpleServiceBean implements SimpleService {
    public String sayHello(String message) {
        System.out.println("*** Hello message received: " + message);
        return "Hi there!!";
    }
}

public interface SimpleService {
    String sayHello(String message);
}
Overview
Welcome to the SwitchYard User Guide. This document provides a detailed explanation of the moving parts in SwitchYard. If you are looking for a way to get up and running quickly, be sure to check out the Getting Started guide quickly.
What is a SwitchYard?
SwitchYard provides an environment for easily applying SOA (Service Oriented Architecture) concepts to integration applications. A SwitchYard application is comprised of one or more components which may provide a service and/or consume service references , where a service is simply a named interface and a reference is simply a named interface that resolves to a service. These are more narrowly classified as component services and component references . A component may be implemented using a variety of technologies including: Java, a Camel route definition, a BPMN2 process, a Drools rule (DRL file), BPEL.
A component service may be promoted to a composite service , which allows the service to be accessed by other applications. Like a component service, a composite service is a named interface. However, instead of being associated with an implementation (i.e. a component), a composite service is associated with one or more bindings . A binding describes an endpoint through which other applications can communicate with the service being promoted (e.g. a JMS queue, a directory on a file system, a REST URL, etc.).
A component reference may resolve to a component service within the application or may be promoted to a composite reference . Like a component reference, a composite reference is a named interface. However, in addition to describing the characteristics of a required service it also describes the location of the service through one or more bindings (e.g. a JMS queue, SOAP over HTTP, etc.). A composite reference may also be conceptualized as an external service required by the application.
The following screenshot illustrates how each of these are manifest in the SwitchYard editor in Eclipse.

Working With Messages
Conceptually, the diagram above represents a left-to-right message flow: messages enter the system through the composite service on the left, are processed by components in the middle and exit the system through the composite reference on the right. Service interfaces are used to describe the operations available including the input, output and fault types for each operation. Interfaces in SwitchYard are constrained to those that describe operations with a single input, optional output and optional fault. This aligns well with the message in/message out paradigm prevalent in integration applications.
SwitchYard provides three different ways to define interfaces: Java interface, WSDL port types, and generic ESB. Java interfaces and WSDL port types allow users to define interfaces with one or more operations (although those operations are constrained to having a single parameter, an optional return and an optional fault), whereas an ESB interface declares the input, output and fault type for a single, unnamed operation.
Types are names which identify the structure of the message. Java interfaces support working with Java types. WSDL port types support working with XML types. ESB interfaces support working with blobs (although Java and WSDL interfaces can also support blob types, e.g. by using a CDATA in XML or by adding @OperationTypes to a Java method).
Transformers are used when a message is passed to a service whose input type differs from the type specified on the source (e.g. from a composite service (source) to its promoted component service (target), or from a component reference (source) to the resolved service (target)) . (For interfaces containing multiple operations, it is required that the target interface includes all operations named in the source interface.) SwitchYard automatically detects that a transformation is required and looks for a transformer that is capable of converting the source type (i.e. parameter type on the source or return/fault type on the target) to its target type (i.e. parameter type on the target or return/fault type on the source). The transformer is invoked and the resulting content is forwarded to/from the target service. If a transformer cannot be found, an exception is thrown and the invocation fails.
Service Implementations
Bean Services
The Bean Component is a pluggable container in SwitchYard which allows Java classes (or beans) to provide and consume services. This means that you can implement a service by simply annotating a Java class. It also means you can consume a service by injecting a reference to that service directly into your Java class. Rather than writing our own POJO container to provide this capability, we have implemented the bean component as a Weld extension. No need to learn a new programming model - bean services are standard CDI beans with a few extra annotations. This also opens up the possibilities of how SwitchYard is used; you can now expose existing CDI-based beans in your application as services to the outside world or consume services within your bean.
Providing a Service
Providing a service with the Bean component is as simple as adding an @Service annotation to your bean.
The SimpleService interface represents the Service Interface, defining the service operations that are exposed by SwitchYard.
The only other thing you need is a META-INF/beans.xml file in your deployed application. When the application is deployed, the Weld runtime scans the application for beans and enlists the SwitchYardCDIServiceDiscovery CDI extension in the CDI lifecycle. Our extension will pick up @Service beans and make them available to the application deployer (will depend on the container). At this point, the service can be invoked from other services within SwitchYard or bound to a wire protocol via SwitchYard gateways.
Service Operations
All SwitchYard Services, no matter what the implementation type, are composed of one or more Service Operations. As you might imagine, in the case of a Bean Service, the Service Operations are the set of Java methods exposed by the Service Interface.
There are a few restrictions when it comes to defining Bean Service Operations:
-
Declares a maximum of one Input type i.e. the Java method signature must have a maximum of one Java parameter.
-
Declares a maximum of one Output type. This is obviously enforced by the Java language since you can only define one return type on a Java method.
-
Declares a maximum of one Fault (Exception) type.
Service Operation Types
All Service Operations on a SwitchYard Service can define an Input , Output and Fault message. These messages have a type associated with them, which is defined as a QName. This type is used by the data transformation layer, when trying to work out which transformers to apply to a Message payload.
For bean Services, the default type QName for Input (input param), Output (return value) and Fault (Exception) are derived from the Java class name in each case (param, return, throws). For some types however (e.g. org.w3c.dom.Element), the Java type name alone does not tell you the real type of the data being held by that Java Object instance. For this reason, Bean Service Operations (methods) can be annotated with the @OperationTypes annotation e.g.
public interface OrderService {

    @OperationTypes(
        in = "{http://acme.com/orders}createOrder",
        out = "{http://acme.com/orders}createOrderResult",
        fault = "java:com.acme.exceptions.OrderManagementException"
    )
    Element createOrder(Element order) throws OrderCreateFailureException;

}
It's also possible to set the default data type for a Java type using the @DefaultType Type level annotation. This is useful for setting the type for a hierarchy of Java types. Note in the example code above how we changed the type for OrderCreateFailureException (to "java:com.acme.exceptions.OrderManagementException") by defining a fault type on the @OperationTypes. It's type would otherwise default to "java:com.acme.exceptions.OrderCreateFailureException". We could also do this by annotating the base OrderManagementException class with the @DefaultType annotation. This would set the default type for the OrderManagementException class and all its sub-classes, including OrderCreateFailureException, which would mean not having to defining a fault type on the @OperationTypes wherever one of these exceptions is used on a Bean Service Operation.
SwitchYard Context Injection
Sometimes you need access to the SwitchYard Exchange Context instance associated with a given Bean Service Operation invocation. To access this, simply add a Context property to your bean and annotate it with the CDI @Inject annotation.
@Service(SimpleService.class)
public class SimpleServiceBean implements SimpleService {

    @Inject
    private Context context;

    public String sayHello(String message) {
        System.out.println("*** Funky Context Property Value: " + context.getPropertyValue("funkyContextProperty"));
        return "Hi there!!";
    }
}
Note that you can only make calls on the Context instance within the scope of one of the Service Operation methods. Invoking it outside this scope will result in an UnsupportedOperationException being thrown.
Consuming a Service
Consuming a SwitchYard service from within a CDI bean is done via @Reference annotations.
@Service(ConsumerService.class)
public class ConsumerServiceBean implements ConsumerService {

    @Inject
    @Reference
    private SimpleService service;

    public void consumeSomeService(String consumerName) {
        service.sayHello("Hello " + consumerName);
    }
}

public interface ConsumerService {

    void consumeSomeService(String consumerName);
}
Note that the contract for the service is all that's exposed to the bean consumer. The reference could point to a service that is hosted outside of SwitchYard and exposed over JMS, SOAP, FTP, etc. The SwitchYard runtime handles the resolution of the service reference to a concrete service, allowing your service logic to remain blissfully ignorant. Invocations made through this reference are routed through the SwitchYard exchange mechanism.
The @Reference annotation can accept a service name in cases where the default name resolution (interface Class simple name e.g. "OrderService") are not appropriate.
@Reference("urn:myservices:purchasing:OrderService")
private OrderService orders;
This can be useful when the default name resolution is not appropriate. Keep in mind that the name used by the reference is not required to match the target service, but it resolve to a service through some mechanism. For example, the deployed application could contain wiring configuration which maps the service name used by the bean reference to a different service name in the runtime.
Bean Services In a Java EE Web Application Container
As of SwitchYard 0.2.0, applications can be deployed in a JEE Web Application Container such as Tomcat or Jetty i.e. you don't need to use the SwitchYard Application Servers (AS6 or AS7).
Two distinct tasks need to be performed in order to get your CDI based SwitchYard application working in your Web Application Container:
-
Configure the SwitchYard WebApplicationDeployer Servlet Listener in your Web Application.
-
Configure Weld into your Servlet Container.
See the "webapp-deploy" quickstart (in the demos folder) as an example of how to create a CDI Bean based SwitchYard application that can be deployed on Tomcat.
JavaServer Faces
The JavaServer Faces (JSF) technology provides a server-side component framework that is designed to simplify the development of user interfaces (UIs) for Java EE applications. JSF has very tight integration with CDI to provide the Object Model behind the JSF user interface components.
The fact that SwitchYard Bean Services are based on CDI means it's possible to have a really nice integration between SwitchYard Bean Services and a JSF based user interface. This section is not an CDI or JSF reference, but does provide some tips/guidelines on using these technologies within the context of SwitchYard. This list of tips will grow and be refined as more use cases are tested and verified.
JavaServer Faces - General Guidelines
The following guidelines/tips should apply to any container when building a JSF user interface on top of a SwitchYard Service.
Indirect Service Invocation
As with any JSF based user interface, the JSF pages will contain EL tokens referencing scoped CDI beans (by name ala the @Named bean annotation). It's possible to annotate your SwitchYard Service CDI beans with the @Named annotation and inject them directly into your application's JSF components, but that would result in your JSF pages making direct invocations on the Service implementation (i.e. the Service implementation bean would be injected directly into the JSF components). What you really want to do is to invoke your SwitchYard Services through the SwitchYard Exchange mechanism. This reduces the coupling between your JSF components and your SwitchYard Service implementations.
Currently, the only way to invoke a SwitchYard CDI Bean Service through the SwitchYard Exchange mechanism is to invoke them through a @Reference injected Service reference (other options may be available in future). This provides a client side proxy bean that handles all the SwitchYard Exchange invocation magic for all the operations exposed by the Service in question. The catch here is that these proxy beans are not available (through CDI) to the JSF components, so you need a bog standard named (@Named) CDI bean containing an injected @Reference sitting between the JSF components and the SwitchYard CDI Bean Services. This is not really a problem though, because your JSF components will likely have a more natural interaction with a business/model type value-object bean (getters/setters) than they will with a Service interface type bean (operations). So, a layer of indirection will probably make sense anyway.
So if you consider an example of an OrderService (Service implementation not shown):
public interface OrderService {

    OrderAck submitOrder(Order order);

}

public class Order implements Serializable {

    private String orderId;
    private String itemId;
    private int quantity = 1;

    public String getOrderId() {
        return orderId;
    }

    public void setOrderId(String orderId) {
        this.orderId = orderId;
    }

    public String getItemId() {
        return itemId;
    }

    public void setItemId(String itemId) {
        this.itemId = itemId;
    }

    public int getQuantity() {
        return quantity;
    }

    public void setQuantity(int quantity) {
        this.quantity = quantity;
    }
}
Your JSF components will probably have a more natural interaction with the Order bean than with the OrderService e.g.:
<div id="content">
    <h1>New Order</h1>

    <div style="color: red">
       <h:messages id="messages" globalOnly="false" />
    </div>

    <h:form id="newOrder">
        <div>
            Order ID:
            <h:inputText id="orderID" value="#{order.orderId}" required="true"/>
            <br/>
            Item ID:
            <h:inputText id="itemID" value="#{order.itemId}" required="true"/>
            <br/>
            Quantity:
            <h:inputText id="quantity" value="#{order.quantity}" required="true"/>
            <p/>
            <h:commandButton id="createOrder" value="Create" action="#{order.create}"/>
        </div>
    </h:form>

</div>
However, in order to make this work, we need to make a few tweaks to the Order bean:
-
Annotating it with @Named and @RequestScoped.
-
Adding a @Reference to the OrderService.
-
Implementing the create method that invokes the OrderService reference (Exchange proxy).
@Named
@RequestScoped
public class Order implements Serializable {

    @Inject
    @Reference
    private OrderService orderService;

    private String orderId;
    private String itemId;
    private int quantity = 1;

    public String getOrderId() {
        return orderId;
    }

    public void setOrderId(String orderId) {
        this.orderId = orderId;
    }

    public String getItemId() {
        return itemId;
    }

    public void setItemId(String itemId) {
        this.itemId = itemId;
    }

    public int getQuantity() {
        return quantity;
    }

    public void setQuantity(int quantity) {
        this.quantity = quantity;
    }

    public void create() {
        OrderAck serviceAck = orderService.submitOrder(this);
        FacesContext.getCurrentInstance().addMessage(null, new FacesMessage(serviceAck.toString()));
    }
}
To reiterate, because of the @Reference annotation, the orderService property instance is not a reference to the actual Service implementation. Instead, it is a SwitchYard Exchange proxy to that Service implementation.
Also note that by using @Reference injected Service references, your backend Service implementation can be a non CDI Bean Service implementation e.g. a Camel Routing Services. This mechanism opens up all sorts of integration possibilities!
See the "orders" quickstart (in the demos folder) as an example of how to provide a JSF user interface on top of a SwitchYard CDI Bean Service deployed on SwitchYard AS7.
Camel Services
Camel services allow you to leverage the core routing engine inside of Apache Camel to route between services in SwitchYard. The route itself is exposed as a service within SwitchYard, which means it has a well-defined contract and can be injected into any other service in the runtime. The routing logic can be expressed in XML and included directly in the service component configuration, or you can use the Java DSL to define the route in an annotated Java class.
Java DSL Routes
SwitchYard provides an @Route annotation which can be used to declare that a class contains a Camel route which should be represented as a service in SwitchYard. The @Route annotation has a single required element which identifies the service interface to be used by the route. Aside from this annotation, the class looks exactly like a route that you would define in Camel alone.
@Route(JavaDSL.class)
public class JavaDSLBuilder extends RouteBuilder {
        public void configure() {
        from("switchyard://JavaDSL")
            .log("Message received in Java DSL Route")
            .log("${body}")
            .split(body(String.class).tokenize("\n"))
            .filter(body(String.class).startsWith("sally:"))
            .to("switchyard://XMLService?operationName=acceptMessage");
    }
}
When an application containing one or more Java DSL routes is built, the SwitchYard Maven plugin will automatically generate the required service component configuration in META-INF/switchyard.xml. The above route would produce the following configuration:
<component name="JavaDSLBuilder">
    <implementation.camel xmlns="urn:switchyard-component-camel:config:1.0">
        <java class="org.switchyard.quickstarts.camel.service.JavaDSLBuilder"/>
    </implementation.camel>
    <service name="JavaDSL">
        <interface.java interface="org.switchyard.quickstarts.camel.service.JavaDSL"/>
    </service>
</component>
The "from" endpoint in a Camel service must always equal the service name. This allows SwitchYard to establish service bindings outside the route definition itself.
XML Routes
Configuring a Camel service using XML is done using the <implementation.camel> configuration directly as follows:
<sca:component name="CamelComponent">
   <implementation.camel xmlns="urn:switchyard-component-camel:config:1.0">
       <route xmlns="http://camel.apache.org/schema/spring" id="Camel Test Route">
           <log message="ItemId [${body}]"/>
           <to uri="switchyard://WarehouseService?operationName=hasItem"/>
           <log message="Title Name [${body}]"/>
       </route>
    </implementation.camel>
    <sca:service name="OrderService">
        <sca:interface.java interface="org.switchyard.component.camel.deploy.support.OrderService"/>
    </sca:service>
    <sca:reference name="WarehouseService">
        <sca:interface.java interface="org.switchyard.component.camel.deploy.support.WarehouseService"/>
    </sca:reference>
</sca:component>
You'll notice in the above configuration that the route in the <implementation.camel> does not specify a from endpoint on the route definition. For Camel XML routes, Switchyard automatically adds this for the service. The above would be invokable by using the following code (snippet from a SwitchYard test):
String title = newInvoker("OrderService").operation("getTitleForItem").sendInOut("10").getContent(String.class);
Running the above code snippet would generate the following in you console log:
10:57:45,915 INFO  [impl.DefaultCamelContext] Apache Camel 2.6.0 (CamelContext: camel-1) started in 0.838 seconds
10:57:46,284 INFO  [impl.DefaultCamelContext] Route: Camel Test Route started and consuming from: Endpoint[switchyard://OrderService]
10:57:46,307 INFO  [impl.DefaultCamelContext] Apache Camel 2.6.0 (CamelContext: camel-1) is starting
10:57:46,307 INFO  [impl.DefaultCamelContext] Total 1 routes, of which 1 is started.
10:57:46,307 INFO  [impl.DefaultCamelContext] Apache Camel 2.6.0 (CamelContext: camel-1) started in 0.000 seconds
10:57:46,428 INFO  [Camel Test Route] ItemId [10]
10:57:46,434 INFO  [Camel Test Route] Title Name [Fletch]
SwitchYard Endpoints
The Camel component contains not only wraps Camel, it defines a Camel component itself which maps to switchyard:// endpoint URIs. As seen in the above examples, the switchyard:// endpoint scheme can be used to route between Camel routes and SwitchYard services. Endpoint configuration is very straightforward:
switchyard://[service-name]?operationName=[operation-name]
-
service-name : name of the SwitchYard service
-
operation-name : name of the service operation to be invoked. This is only used on references and is optional if the target service only has a single operation.
CDI Integration
SwitchYard integrates the CDI Bean Registry with the SwitchYard Camel component. This means that, within SwitchYard Camel Route definitions, you can reference named (@Named) CDI Beans.
Consider an example of where you have the following CDI bean:
@Named
@ApplicationScoped
public class StringUtil {

    public String trim(String string) {
        return string.trim();
    }

    // Other utilities...

}
This bean can be used inside your SwitchYard Camel Routes as follows:
@Route(JavaDSL.class)
public class JavaDSLBuilder extends RouteBuilder {

    public void configure() {
        from("switchyard://JavaDSL")
            .split(body(String.class).tokenize("\n"))
            .filter(body(String.class).startsWith("sally:"))
            .bean(StringUtil.class, "trim(String)");
    }
}
See Camel's Bean Binding documentation for more details.
Knowledge Services
Knowledge Services are SwitchYard Services that leverage KIE, and thus, Drools and/or jBPM:
Given that Drools and jBPM are very tightly integrated under KIE, much of their runtime configuration can be shared by both SwitchYard's BPM component and its Rules component. Therefore, documentation on this page refers to elements that are either exactly, or structurally, identical to both the BPM and Rules components. That is to say, any configuration element you see here can be used in the same way for both BPM and Rules. Sometimes, however, the context of the element is significant, so cases like that will be identified where applicable.
Note
For some of the configuration elements below, you might wonder why it is a shared element between both the BPM and Rules components. For example, Channels are something only applicable to Rules, right? Yes, however what if your BPM process has a node which executes business rules, and those rules reference channels? In that case, you need a way to configure channels for the rules within your process. Thus, it is documented here.
In each description below, you will see an XML section and an Annotation section. When using the SwitchYard tooling for Eclipse, the switchyard.xml will be generated for you. You can also hand-edit this file. Alternatively, you can annotate your service interfaces with annotations, and use SwitchYard’s Maven plugin to auto-generate the switchyard.xml for you, based on those annotations. If using the plugin, you will have to configure it with either and/or both the BPMSwitchYardScanner or the RulesSwitchYardScanner.
Actions
Actions are how Knowledge Services know how to map service operation invocations to their appropriate runtime counterparts. For example, when method "myOperation" is called, what should happen? Execute some business rules? Start a business process?
Using the XML below as reference, when the SwitchyYard service’s "myOperation" operation is invoked, an action of type "ACTION_TYPE" will be taken. Note that "ACTION_TYPE" is just a placeholder here. Actual ActionTypes are specific to the BPM and Rules components. Please refer to the specific documentation on those pages.
At this time, the id attribute is only applicable to the Rules component.
Please see the Mapping section below for an explanation of the globals, inputs, and outputs sections.
XML
<actions>
    <action id="myId" operation="myOperation" type="ACTION_TYPE">
        <globals>
            <mapping/>
        </globals>
        <inputs>
            <mapping/>
        </inputs>
        <outputs>
            <mapping/>
        </outputs>
    </action>
</actions>
Annotation
The BPM and Rules components have specific action annotations that map to specific ActionTypes. Please refer to the specific documentation on those pages.
Mappings
Mappings are the way to move data in or out of the action for that operation. You can specify as many mappings as you like for an action, and they get grouped as globals, inputs or outputs:
-
Global mappings are used to provide data that is applicable to the entire action, and is often used in classic in/out param (or data-holder/provider) fashion. An example of a global mapping is a global variable specified within a Drools Rule Language (DRL) file.
-
Input mappings are used to provide data that represents parameters being fed into an action. An example of an input mapping for BPM could be a process variable used while starting a business process. For Rules, it could be a fact to insert into a rules engine session.
-
Output mappings are used to return data out of an action. An example of an output mapping would be a BPM process variable that you want to set as the outgoing (response) message’s content.
Currently, the only supported expressionType is MVEL, which is the default, so you don’t have to specify it. The expression itself can be any MVEL expression, and variables that are available to you by default are:
-
exchange - The current org.switchyard.Exchange.
-
context - The current org.switchyard.Context.
-
message - The current org.switchyard.Message.
Whatever the resultant value of the expression is constitutes the data that is made available to the action. Some examples:
-
expression="message.content" - This is the same as message.getContent().
-
expression="context[‘foo’]" scope="IN" - This is the same as context.getProperty("foo", Scope.IN).getValue(), in a null-safe manner.
Note
Specifying the scope attribute only matters if you use the context variable inside your expression. If you don’t specify a scope, the default Context access (which is done like a Map, if you picked up on that), is done with Scope.EXCHANGE for global mappings, Scope.IN for input mappings, and Scope.OUT for output mappings.
Specifying the variable attribute is often optional, but this depends on the usage. For example, if you are specifying a global variable for a rule, or a process variable to put into (or get out of) a BPM process, then it is required. However, if the result of the expression is to be used as facts for rule session insertion, than specifying a variable name isn’t applicable.
XML
<mapping expression="theExpression" expressionType="MVEL" scope="IN" variable="theVariable"/>
Annotation
@Mapping(expression="theExpression", expressionType=ExpressionType.MVEL, scope=Scope.IN, variable="theVariable")
Channels
Drools supports the notion of "Channels", which are basically "exit points" in your DRL. Here is an example:
package com.example
rule "example rule"
    when
        $f : Foo ( bar > 10 )
    then
        channels["Bar"].send( $f.getBar() );
end
XML
<channels>
    <channel class="com.example.BarChannel" name="Bar"/>
</channels>
Annotation
channels={
    @Channel(value=BarChannel.class, name="Bar")
}
Warning
Channels must implement org.kie.runtime.Channel.
SwitchYard Service Channel
SwitchYard provides an out-of-the-box Channel which allows you to invoke (one-way) other SwitchYard services directly and easily from your DRL. Here is an example:
XML
<channel name="HelloWorld" reference="HelloWorld" operation="greet"/>
Annotation
import org.switchyard.component.common.knowledge.channel.SwitchYardServiceChannel;
// ...
@Channel(value=SwitchYardServiceChannel.class, name="HelloWorld", reference="HelloWorld", operation="greet")
Attribute Reference:
-
value (annotation) / class (xml) = The channel implementation class. (Default is SwitchYardServiceChannel.)
-
name = The channel name. (default = simple name of the implementation class)
-
reference = The service reference qualified name.
-
operation = The service reference operation name.
-
input = The service reference operation input name.
-
interfaze (annotation) = The service reference interface class name.
Listeners
Listeners are used to monitor specific types of events that occur during Knowledge execution. An example of this would be to audit a BPM process, and save the audit details into a database while the process progresses. Then at a later time, these details can be reported against. There are many out-of-the-box Listeners that Drools and jBPM provide, and you can write your own. The only restriction in writing your own Listener is that it must, at the minimum, implement java.util.EventListener. However, your Listener won’t actually be registered for anything unless it also implements one of the respected KIE/Drools/jBPM Listener interfaces. For example, org.drools.event.WorkingMemoryEventListener, org.drools.event.AgendaEventListener, org.kie.event.process.ProcessEventListener, or similar.
Note
If the Listeners provide a Constructor taking a single KieRuntimeEventManager (or KnowledgeRuntimeEventManager) as a parameter, that is used and it is assumed it will do the work of registering itself with the passed-in event manager (OOTB {{WorkingMemoryLogger}}s do this). Otherwise, a no-arg constructor is assumed, and SwitchYard will do the work of registering the Listeners for each of the respected interfaces it implements.
XML
<listeners>
    <listener class="org.drools.event.DebugProcessEventListener"/>
    <listener class="org.kie.event.rule.DebugWorkingMemoryEventListener"/>
    <listener class="com.example.MyListener"/>
</listeners>
Annotation
listeners={
    @Listener(DebugProcessEventListener.class),
    @Listener(DebugWorkingMemoryEventListener.class),
    @Listener(MyListener.class)
}
Loggers
Loggers are special types of Listeners, and are used to output the events that occur during Knowledge execution. Support for Loggers is done using a dedicated configuration element. Events can be logged to the CONSOLE or to a FILE (or THREADED_FILE). If they are directed to a file, that log can later be opened via the Drools Eclipse tooling.
XML
<loggers>
    <logger interval="2000" log="myLog" type="THREADED_FILE"/>
    <logger type="CONSOLE/>
</loggers>
Annotation
loggers={
    @Logger(interval=2000, log="myLog", type=LoggerType.THREADED_FILE),
    @Logger(type=LoggerType.CONSOLE)
}
Manifest
The only configuration element more important than Actions is the Manifest, which is where you specify where the "intelligence" of the component comes from. For the BPM component, this will be, at the minimum, the location of the BPMN 2 process definition file. For the Rules component, this will most likely be the location of DRL, DSL, DSLR or XLS files. There are two ways to to configure the Manifest:
-
With a KIE Container. This relies upon the existence of a META-INF/kmodule.xml configuration file.
-
With a manually defined list of Resources.
Warning
These two options are mutually exclusive: You have to choose one or the other!
The following examples assume there is a DRL file located at classpath: com/example/MyRules.drl
Option 1 (KIE Container):
META-INF/kmodule.xml
<kmodule xmlns="http://jboss.org/kie/6.0.0/kmodule">
    <kbase name="com.example">
        <ksession name="my-session"/>
    </kbase>
</kmodule>
XML
<manifest>
    <container sessionName="my-session"/>
</manifest>
Annotation
@Manifest(container=@Container(sessionName="my-session"))
In addition to the sessionName attribute, you can also specify baseName and releaseId, if desired.
Also, scanning for updates is supported only with the container option (not the resources option). To enable this, simply set scan="true" and, optionally, scanInterval=<# of milliseconds>.
Option 2 (Resources):
XML
<manifest>
    <resources>
        <resource location="com/example/MyProcess.bpmn" type="BPMN2"/>
        <resource location="com/example/MyRules.drl" type="DRL"/>
    </resources>
</manifest>
Annotation
@Manifest(resources={
    @Resource(location="com/example/MyProcess.bpmn" type="BPMN2"),
    @Resource(location="com/example/MyRules.drl" type="DRL")
})
Using a Repository
If your resources are stored in a repository like Guvnor, they can be loaded remotely. To do so, configure a ChangeSet.xml file as a resource:
<resource location="ChangeSet.xml" type="CHANGE_SET"/>
Then, inside the ChangeSet.xml file, specify the the details of accessing the remote package:
<change-set xmlns='http://drools.org/drools-5.0/change-set' xmlns:xs='http://www.w3.org/2001/XMLSchema-instance' xs:schemaLocation='http://drools.org/drools-5.0/change-set http://anonsvn.jboss.org/repos/labs/labs/jbossrules/trunk/drools-api/src/main/resources/change-set-1.0.0.xsd'>
    <add>
        <resource source='http://localhost:8080/drools-guvnor/org.drools.guvnor.Guvnor/package/sandbox.michele/LATEST' type='PKG' basicAuthentication="enabled" username="admin" password="admin"/>
    </add>
</change-set>
Properties
Properties are the way to provide "hints" to the underlying KIE/Drools/jBPM runtime on how certain options are configured. Rather than having to expose every single KIE/Drools/jBPM option as a configurable element or attribute within SwitchYard, they can be set as open-ended properties.
Properties are an advanced topic, so setting them should be done with care. All possible property names and values will not be listed here, but as a starting point, in your IDE open up a Type Heirarchy with a root of org.kie.conf.Option. That is your full list. Here are just a couple examples:
XML
<properties>
    <property name="drools.clockType" value="pseudo"/>
    <property name="drools.eventProcessingMode" value="stream"/>
</properties>
Annotation
private static final String clockTypeName = org.kie.runtime.conf.ClockTypeOption.PROPERTY_NAME;
private static final String clockTypeValue = org.drools.ClockType.PSEUDO_CLOCK.value();
private static final String eventProcessingName = org.kie.conf.EventProcessingOption.PROPERTY_NAME;
private static final String eventProcessingValue = org.kie.conf.EventProcessintOption.STREAM.getMode();

properties={
    @Property(name=MyClass.clockTypeName, value=MyClass.clockTypeValue),
    @Property(name=MyClass.eventProcessingName, value=MyClass.eventProcessingValue)
}
BPM Services
The BPM Component is a pluggable container in SwitchYard which allows a business process to be exposed as a service. One fronts their business process with a custom interface and, if desired, can easily annotate it's methods to define which should start a process, signal a process event, or abort a process.
Important
A BPM Service is a type of Knowledge Service (the other type being a Rules Service). Thus, it is strongly suggested you familiarize yourself with the shared configuration capabilities of Knowledge Services.
Note
Configuration of SwitchYard's BPM Component has been overhauled greatly between 0.6 and 0.7. Documentation on this page reflects 0.7. The wiki article: "BPM & Rules Component Configuration Changes" is a useful resource to consult.
Providing a Service
To provide a service with the BPM component, you will have to:
-
Define your process using BPMN2.
-
Create a java interface, fronting your BPMN2 process, which can be exposed to other services, and/or to your binding(s).
-
Add the component containing the implementation and service interface to the SwitchYard configuration. This step can be automated using annotations and the SwitchYard plugin, explained below.
Here is an example of the component section of the SwitchYard configuration:
<component name="MyService">
    <implementation.bpm xmlns="urn:switchyard-component-bpm:config:1.0" processId="MyService">
        <manifest>
            <resources>
                <resource location="META-INF/MyService.bpmn" type="BPMN2">
            </resources>
        </manifest>
        <workItemHandlers>
            <workItemHandler class="org.switchyard.component.bpm.work.SwitchYardServiceWorkItemHandler" name="SwitchYard Service"/>
        </workItemHandlers>
    </implementation.bpm>
    <service name="MyService">
        <interface.java interface="org.switchyard.userguide.MyService"/>
    </service>
</component>
The MyService interface can be as simple as this, with no SwitchYard-specific imports:
package org.switchyard.userguide;
public interface MyService {
    public void start(String data);
}
However, if you want to have the SwitchYard configuration for this section auto-generated for you, you can use annotations and the SwitchYard Maven Plugin. To do this, you can either add SwitchYard-specific annotations to your interface directly, or (and this is the recommended approach) you can create a separate interface for this purpose. Let's do that:
package org.switchyard.userguide;
import org.switchyard.component.bpm.annotation.BPM;
import org.switchyard.component.bpm.work.SwitchYardServiceWorkItemHandler;
import org.switchyard.component.common.knowledge.annotation.Manifest;
import org.switchayrd.component.common.knowledge.annotation.Resource;
@BPM(
    value=MyService.class,
    processId="MyService",
    manifest=@Manifest(resources={
        @Resource(location="META-INF/MyService.bpmn", type="BPMN2")
    }),
    workItemHandlers={@WorkItemHandler(value=SwitchYardServiceWorkItemHandler.class)}
)
public interface MyServiceProcess {}
At this point you might be wondering what the resources and workItemHandlers attributes of the annotations are.
First, a Resource represents an additional artifact that is required by your BPM process. It could be anything you could think of, including a properties file, a Drools Rule Language file, or whatever. But it needs to be available to the BPM component's runtime for that process. You can either add the resource to the XML yourself, or use the annotation, similar to the examples above.
Next, a WorkItemHandler is a way for you to add your own code into the business process. Simply implement the org.kie.runtime.process.WorkItemHandler interface, and add it to the SwitchYard configuration, either manually in XML, or by referencing your implementation via the workItemHandlers attribute of the BPM annotation, similarly to how we did with resources above.
By default, the SwitchYardServiceWorkItemHandler is always added for you by the SwitchYard Maven plugin. That handler allows you to easily call out to other SwitchYard services by name within your business process. Please see the section "Consuming a BPM Service" below for more information.
Process Interaction
In addition to the interface-level Process annotation, there are also three method-level annotations available to you. Here is an example:
package org.switchyard.userguide;
public interface MyService {
    public void start(String data);
    public void signal(String data);
    public void stop(String data);
}

package org.switchyard.userguide;
import org.switchyard.component.bpm.annotation.AbortProcessInstance;
import org.switchyard.component.bpm.annotation.BPM;
import org.switchyard.component.bpm.annotation.SignalEvent;
import org.switchyard.component.bpm.annotation.StartProcess;
@BPM(MyService.class)
public interface MyServiceProcess extends MyService {
    @StartProcess @Override
    public void start(String data);
    @SignalEvent("myEvent") @Override
    public void signal(String data);
    @AbortProcessInstance @Override
    public void stop(String data);
}
This will then create the following SwitchYard configuration (note that the default processAction type is START_PROCESS for a method, which is why in our original version of this example we didn't have to use the @StartProcess annotation):
<component name="MyService">
    <implementation.bpm xmlns="urn:switchyard-component-bpm:config:1.0" processId="MyService">
        <actions>
            <action operation="start" type="START_PROCESS"/>
            <action id="myEvent" operation="signal" type="SIGNAL_EVENT"/>
            <action operation="stop" type="ABORT_PROCESS_INSTANCE"/>
        </actions>
        <manifest>
            <resources>
                <resource location="META-INF/MyService.bpmn" type="BPMN2"/>
            </resources>
        </manifest>
        <workItemHandlers>
            <workItemHandler class="org.switchyard.component.bpm.work.SwitchYardServiceWorkItemHandler" name="SwitchYard Service"/>
        </workItemHandlers>
    </implementation.bpm>
    <service name="MyService">
        <interface.java interface="org.switchyard.userguide.MyService"/>
    </service>
</component>
@StartProcess
Methods annotated this way (or have the associated xml) will start new process instances.
When you start your process (actually, any interaction with a service whose implementation is bpm), the processInstanceId will be put into the Switchyard Context at Scope.EXCHANGE, and will be fed back to your client in a binding-specific way. For soap, it will be in the form of a soap header in the soap response envelope:
<soap:Header>
    <bpm:processInstanceId xmlns:bpm="urn:switchyard-component-bpm:bpm:1.0">1</bpm:processInstanceId>
</soap:Header>
In future process interactions, you will need to send back that same processInstanceId, so that the correlation is done properly. For soap, that means including the same soap header that was returned in the response to be sent back with subsequent requests.
Important
If you are using persistence, the sessionId will also be available in the Context, and will need to be fed back as well. It would look the same way in the soap header as the processInstanceId does.
@SignalEvent
Methods annotated this way (or have the associated xml) will have the associated process instance signaled. As above, the processInstanceId will need to have been available in the Context so the correct process instance is correlated.
There are two other pieces of information when signaling an event:
-
The "id". In BPMN2 lexicon, this is known as the "signal id", but in jBPM can also be known as the "event type". This is set as the id of the annotation.
-
Note: In BPMN2, a signal looks like this: <signal id="foo" value="bar"/> In jBPM, it is the signal id that is respected, not the name. This might require you to tweak a tooling-generated id to whatever you want it called.
-
-
The "event object". This is the data representing the event itself. There are two ways to pass in the event object:
-
Via a Context object, passed similar to the processInstanceId, known as "signalEvent". If this is the case, you are limited to a String type.
-
Via the Message content object itself (your payload). If the signalEvent Context property is absent, the content of the Message is used as the event object.
-
@AbortProcessInstance
Methods annotated this way (or have the associated xml) will cause associated process instances to be aborted. As above, the processInstanceId will need to have been available in the Context so the correct process instance is correlated.
Auditing a Process
Please see the Listeners and Loggers sections found in the Knowledge Services documentation.
Process Variables
Important
For you to be able to use variables inside your process, you have to declare your variable names at the process level, as well as in the Parameter Mapping (and possibly Result Mapping) of any process node that wants access to those variables. This can be done easily in the jBPM Eclipse tooling by using the Properties view when clicking on either the whitespace around the process, or on any of your process nodes. For more information, please refer to the jBPM documentation.
Mapping Parameter/Result Variables
Mapping variables from your SwitchYard Exchange, Context or Message into jBPM process variables can be done via expressions, the default (and only currently supported) type is MVEL. This can be done via the following XML:
<implementation.bpm ...>

    <actions>
        <action ...>
            <inputs>
                <mapping expression="exchange.serviceName.localPart" expressionType="MVEL" variable="service"/>
                <mapping expression="context['org.switchyard.messageId']" variable="messageId" contextScope="IN"/>
                <mapping expression="message.content" variable="contentIn"/>
            </inputs>
            <outputs>
                <mapping expression="message.content" variable="contentOut"/>
            </outputs>
        </action>
    </actions>
    ...
</implementation.bpm>
The same can be done via annotations:
@StartProcess(...
    inputs={
        @Mapping(expression="exchange.serviceName.localPart", expressionType=ExpressionType.MVEL, variable="service"),
        @Mapping(expression="context['org.switchyard.messageId']", variable="messageId", contextScope=Scope.IN),
        @Mapping(expression="message.content", variable="contentIn")},
    outputs={
        @Mapping=(expression="message.content", variable="contentOut")
    })
public MyDataResponse process(MyData data);
For more information on mapping variables, please see the Mappings sections of the Knowledge Services documentation.
Consuming a Service
There are two ways of consuming Services with the SwitchYard BPM component:
-
Invoking the BPM implementation through a gateway binding. Since the BPM component exposes a java interface fronting the business process, you can use any of the bindings provided by SwitchYard. This could be a SOAP Binding or a Camel Binding, for example. (Please refer to those sections of this guide for more information.)
-
Invoking other SwitchYard Services from inside a BPM process itself. To do this, you can use the SwitchYardServiceWorkItemHandler, which is provided out-of-the-box. To make authoring BPMN2 processes easier, SwitchYard provides a new widget for the Eclipse BPMN2 Modeler visual editor palette. Here is a screenshot from the "Help Desk" demo quickstart:

On the bottom right hand side under "Custom Task", you can see the SwitchYard Service widget. On the left hand side, you can see the various points of the business process where SwitchYard Services are being invoked. Once you have dropped a SwitchYard Service task in the main window, you can customize it via the Eclipse Properties Editor.
SwitchYard Service Task Properties
The following are properties you can use to configure the SwitchYard Service task:
Service Naming Properties
-
ServiceName: (required) The name of the SwitchYard service to invoke.
-
ServiceOperationName: (optional; default=use the single method name in the service interface, if there is just one) The name of the operation within the SwitchYard service to invoke.
Content I/O Properties
-
ContentInputName: (optional; default=contentInput) The process variable which the message content will be placed in.
-
ContentOutputName: (optional; default=contentOutput) The process variable which the message content will be gotten from.
Fault-Handling Properties (see SwitchYard Service Fault Handling below)
-
FaultResultName: (optional) The name of the output parameter (result variable) the fault (Exception) will be stored under.
-
FaultSignalId: (optional) The bpmn signal id ("event type" in jbpm lingo) that will be used to signal an event in the same process instance. The event object will be the fault (Exception). Please see @SignalEvent above.
-
FaultWorkItemAction: (optional; default=null) After a fault occurs, what should be done? If null, nothing is done. If complete, the current work item (SwitchYard Service task) is completed. If abort, the current work item is aborted.
You can read a more detailed explanation of the Help Desk quickstart demo, as well as how to set up Eclipse to make use of new widget, on this wiki page.
SwitchYard Service Fault Handling
During your process execution, the SwitchYardServiceWorkItemHandler class is used to handle Switchyard Service tasks. It executes service references, per the properties specified in the panel above. Pay particular attention to the list of Fault-Handling Properties. These properties define the behavior of the SwitchYardServiceWorkItemHandler in the case were a fault is encountered when executing the service reference. There are 2 scenarios that the fault-handling covers:
-
"In my process flow, after the SwitchYard Service task, I would like a split gateway where I can inspect a process variable (a "flag") that can tell me that a fault occurred, so that I can diverge one way or another."
-
To do this, specify the FaultResultName property. The SwitchYardServiceWorkItemHandler will make the fault itself available as an output parameter of the task, so that it can be associated with a process variable, and inspected for existence in your split gateway. You must also set the FaultWorkItemAction property to complete, so that the process will continue on to your split gateway!
-
An example bpmn2 process can be found in our JUnit test suite here: BPMWorkTests-FaultResultProcess.bpmn
-
-
"In my process flow, I have multiple places where faults could occur, and I want to have one shared path of fault-handling."
-
To do this, specify the FaultSignalId property. This must match a signal id you specify in your bpmn2 process definition. You can then add an event node in your process that is triggered with this signal id; the flow from that event node on is your fault-handling path. The SwitchYardServiceWorkItemHandler will then signal the proper event with the configured id.
-
An example bpmn2 process can be found in our JUnit test suite here: BPMWorkTests-FaultEventrocess.bpmn
-
Whether you choose scenario 1 or 2 above, the question remains "What next?" If you don't specify a FaultWorkItemAction property, nothing is done. The work item is not completed, nor is it aborted. You can set the property to complete to complete the work item after a fault, or you can set the property to abort to abort the work item after a fault.
Important
The FaultWorkItemAction property was added in SwitchYard 0.8, replacing the CompleteAfterFault property of 0.7 and earlier, at which point the default was to complete the work item.
Rules Services
The Rules Component is a pluggable container in SwitchYard which allows business rules to be exposed as a service. One fronts their rules with a custom interface and, if desired, can easily annotate it's methods to define which should execute the rules.
Important
A Rules Service is a type of Knowledge Service (the other type being a BPM Service). Thus, it is strongly suggested you familiarize yourself with the shared configuration capabilities of Knowledge Services.
Note
Configuration of SwitchYard's Rules Component has been overhauled greatly between 0.6 and 0.7. Documentation on this page reflects 0.7. The wiki article: "BPM & Rules Component Configuration Changes" is a useful resource to consult.
Providing a Service
To provide a service with the Rules component, you will have to:
-
Define your rules. The Rules Component currently supports Drools as the rule engine. Even though it is quite simple to write rules in Drools, that project's developer tooling and business analyst tooling are very mature.
-
Create a java interface, fronting your rules, which can be exposed to other services, and/or to your binding(s).
-
Add the component containing the implementation and service interface to the SwitchYard configuration. This step can be automated using annotations and the SwitchYard plugin, explained below.
Here is an example of the component section of the SwitchYard configuration:
<component name="MyService">
    <implementation.rules xmlns="urn:switchyard-component-rules:config:1.0">
        <actions>
            <action operation="process" type="EXECUTE"/>
        </actions>
        <manifest>
            <resources>
                <resource location="/org/switchyard/userguide/MyService.drl" type="DRL"/>
            </resources>
        </manifest>
    </implementation.rules>
    <service name="MyService">
        <interface.java interface="org.switchyard.userguide.MyService"/>
    </service>
</component>
The MyService interface can be as simple as this, with no SwitchYard-specific imports:
package org.switchyard.userguide;
public interface MyService {
    public void process(MyData data);
}
However, if you want to have the SwitchYard configuration for this section auto-generated for you, you can use annotations and the SwitchYard Maven Plugin. To do this, you can either add SwitchYard-specific annotations to your interface directly, or (and this is the recommended approach) you can create a separate interface for this purpose. Let's do that:
package org.switchyard.userguide;
import org.switchyard.component.common.knowledge.annotation.Manifest;
import org.switchyard.component.common.knowledge.annotation.Resource;
import org.switchyard.component.rules.annotation.Execute;
import org.switchyard.component.rules.annotation.Rules;
@Rules(
    value=MyService.class,
    manifest=@Manifest(resources={
        @Resource(location="/org/switchyard/userguide/MyService.drl", type="DRL")
    })
)
public interface MyServiceRules extends MyService {
    @Execute @Override
    public void process(MyData data);
}
That will create the SwitchYard configuration you saw above!
A few important points:
-
In the original switchyard xml, the <actions/> element is optional. If not specified, the behavior is to execute the rules.
-
You will have to configure the switchyard maven plugin with the RulesSwitchYardScanner.
-
You can list as many resources as the Drools knowledge session requires within the manifest. For more information, please see the Manifest section of the Knowledge Services documentation.
-
You don't have to specify the drl resource using annotations. You can create a switchyard.xml file with the drl defined (as shown in the first example), and the plugin will merge what it found via annotations with what you provided in a preliminary switchyard.xml file.
Stateless vs. Stateful Rules Execution
By default, service method invocation will create a new Drools knowledge session, execute it given the passed-in domain data, and then be cleanly disposed.
However, it is possible to configure SwitchYard so that a stateful knowledge session will be used. Specifically, it will "stick around" spanning multiple invocations. (Please visit the Drools documentation to learn more about stateless vs. stateful knowledge sessions.) To do this, you use the @FireAllRules annotation instead of @Execute. Or similarly in the switchyard.xml, use the FIRE_ALL_RULES action type instead of EXECUTE.
There is also a new capability which allows you to insert facts into a stateful knowledge session without firing the rules (you might want to do that later). In this case, use the @Insert annotation. Or similarly in switchyard.xml, use the INSERT action type.
Mapping Global Variables
Mapping variables from your SwitchYard Exchange, Context or Message into Drools Globals can be done via expressions, the default (and only currently supported) type is MVEL. This can be done via annotions:
@Execute(... globals={
    @Mapping(expression="exchange.serviceName.localPart", expressionType=ExpressionType.MVEL, variable="service"),
    @Mapping(expression="context['org.switchyard.messageId']", variable="messageId", contextScope=Scope.IN),
    @Mapping(expression="message.content", variable="payload")
})

public void process(MyData data);
or via XML:
<implementation.rules ...>
    <actions>
        <action operation="process" type="EXECUTE">
            <globals>
                <mapping expression="exchange.serviceName.localPart" expressionType="MVEL" variable="service"/>
                <mapping expression="context['org.switchyard.messageId']" variable="messageId" contextScope="IN"/>
                <mapping expression="message.content" variable="payload"/>
            </globals>
        </action>
    </actions>
    ...
</implementation.rules>
Your expression can use the variables exchange (org.switchyard.Exchange), context (org.switchyard.Context) or message (org.switchyard.Message). You can see in the example above is that context can be accessed in the expression as a java.util.Map. When accessing it as such, the default properties Scope is IN. This can be overridden using the contextScope attribute by changing it to OUT or EXCHANGE.
Now you can use these global variables in your Drools DRL:
package example

global java.lang.String service
global java.lang.String messageId
global com.example.Payload payload

rule "Example"
    when
        ...
    then
        ...
        System.out.println("service: " + service + ", messageId: " + messageId + ", payload: " + payload);
end
Of course, in a more realistic scenario, the payload would be accessed in rule firing because it was inserted into the session directly by the RulesExchangeHandler, and thus evaluated (rather than being accessed as a global). See Mapping Facts below.
Mapping Facts
The default Object which is inserted into the rules engine as a fact is the SwitchYard Message's content. However, this can be overridden by specifying your own fact mappings.
IMPORTANT: If you specify your own fact mappings, the SwitchYard Message content will not be inserted as a fact. You will have to add a fact mapping with an expression of "message.content" to have it still included.
Mapping facts from your SwitchYard Exchange, Context or Message for insertion into Drools can be done just like Globals. This can be done via annotions:
@Execute(... inputs={
    @Mapping(expression="context['myPropertyFact']", expressionType=ExpressionType.MVEL, contextScope=Scope.IN),
    @Mapping(expression="message.content.myNestedFact")
})

public void process(MyData data);
or via XML:
<implementation.rules ...>

    <actions>
        <action operation="process" type="EXECUTE">
            <inputs>
                <mapping expression="context['myPropertyFact']" expressionType="MVEL" contextScope="IN"/>
                <mapping expression="message.content.myNestedFact"/>
            </inputs>
        </action>
    </actions>
    ...
</implementation.rules>
Note
-
There is no point in specifying the "variable" attribute of the mappings (as done for global mappings), as the result of each expression is inserted as a nameless fact. For stateless execution, the full list of facts is passed to the StatelessKnowledgeSessions' execute(Iterable) method. For stateful execution, each fact is individually inserted into the StatefulKnowledgeSession. And for Complex Event Processing, each fact is individually inserted into the WorkingMemoryEntryPoint.
-
If the result of the mapping expression implements Iterable (for example, a Collection), then the result is iterated over, and each iteration is inserted as a separate fact, rather than the parent Iterable itself being inserted. This is not recursive behavior (i.e: it is only done once).
Complex Event Processing
Complex Event Processing, or "CEP", is an advanced topic, and can best be explained in the Drools Fusion documentation. What will be shown here in the SwitchYard documentation is how it can be configured via annotation:
...
import org.switchyard.component.rules.annotation.FireUntilHalt;
import org.switchyard.component.rules.annotation.Rules;

@Rules(...
    properties={
        @Property(name="drools.clockType", value="realtime"),
        @Property(name="drools.eventProcessingMode", value="stream",
        @Property(name="drools.maxThreads", value="1"),
        @Property(name="drools.multithreadEvaluation", value="false")
    }
)
public interface MyServiceRules extends MyService {
    @FireUntilHalt(id="FooStream")
    public void processFooMessage(FooMessage foo);
    @FireUntilHalt(id="BarStream")
    public void processBarMessage(BarMessage bar);
}
or via XML:
<implementation.rules ...>
    <actions>
        <action id="FooStream" operation="processFooMessage" type="FIRE_UNTIL_HALT"/>
        <action id="BarStream" operation="processBarMessage" type="FIRE_UNTIL_HALT"/>
    </actions>
    ...
    <properties>
        <property name="drools.clockType" value="realtime"/>
        <property name="drools.eventProcessingMode" value="stream"/>
        <property name="drools.maxThreads" value="1"/>
        <property name="drools.multithreadEvaluation" value="false"/>
    </properties>
</implementation.rules>
Auditing a Service
Please see the Listeners and Loggers sections found in the Knowledge Services documentation.
Consuming a Service
Please see the Channels section found in the Knowledge Services documentation.
BPEL Services
The BPEL Component is a pluggable container in SwitchYard which allows a WS-BPEL business process to be exposed as a service through an interface defined using WSDL.
Providing a Service
To provide a service with the BPEL component, you will have to:
-
Define your process using WS-BPEL (e.g. using the Eclipse BPEL editor bundled with JBossTools).
-
Define a WSDL interface for the BPEL service.
-
Define a Deployment Descriptor (e.g. using the ODE Deployment Descriptor editor bundled with JBossTools).
-
Add the component containing the implementation and service interface to the SwitchYard configuration.
Here is an example of the component section of the SwitchYard configuration:
<sca:component name="SayHelloService">
             <bpel:implementation.bpel process="sh:SayHello" />

             <sca:service name="SayHelloService">
                 <sca:interface.wsdl interface="SayHelloArtifacts.wsdl#wsdl.porttype(SayHello)"/>
             </sca:service>
         </sca:component>
The BPEL component contains a single 'implementation.bpel' element that identifies the fully qualified name of the BPEL process.
The component may also contain one or more service elements defining the WSDL port types through which the BPEL process can be accessed.
In the packaged Switchyard application, the BPEL process associated with this fully qualified name, must be present within the root folder of the distribution, along with the deployment descriptor (deploy.xml). An example of the deployment descriptor for the BPEL process referenced above is:
<deploy xmlns="http://www.apache.org/ode/schemas/dd/2007/03"
	xmlns:examples="http://www.jboss.org/bpel/examples" >

	<process name="examples:SayHello">
		<active>true</active>
		<retired>false</retired>
		<process-events generate="all"/>
		<provide partnerLink="client">
			<service name="examples:SayHelloService" port="SayHelloPort"/>
		</provide>
	</process>
</deploy>
Consuming a Service
This section describes how a BPEL process can invoke other services.
The first step is to define the WSDL interface(s), representing the service(s) to be consumed, using an invoke element within the deployment descriptor, e.g.
<process name="ls:loanApprovalProcess">
		<active>true</active>
		<process-events generate="all"/>
		<provide partnerLink="customer">
			<service name="ls:loanService" port="loanService_Port"/>
		</provide>
		<invoke partnerLink="assessor" usePeer2Peer="false">
			<service name="ra:riskAssessor" port="riskAssessor_Port"/>
		</invoke>
	</process>
The 'usePeer2Peer' property informs the BPEL engine not to use internal communications for sending messages between BPEL processes that may be executing within the same engine, and instead pass messages through the SwitchYard infrastructure.
For each consumed service, we then need to create a reference element within the SwitchYard configuration, to locate the WSDL file and identify the port type associated with the required WSDL service/port.
<sca:component name="loanService">
             <bpel:implementation.bpel process="ls:loanApprovalProcess" />
             <sca:service name="loanService">
                 <sca:interface.wsdl interface="loanServicePT.wsdl#wsdl.porttype(loanServicePT)"/>
             </sca:service>
             <sca:reference name="riskAssessor" >
                 <sca:interface.wsdl interface="riskAssessmentPT.wsdl#wsdl.porttype(riskAssessmentPT)"/>
             </sca:reference>
         </sca:component>
Maintain Multiple Versions of a BPEL Process
BPEL processes can be used to implement long lived stateful business processes. However the BPEL process may need to change, over the course of its lifetime, to accomodate new requirements.
This introduces the problem of how to deal with existing active instances of the BPEL process that may not complete for weeks, months or even years. In these situations we need to have a strategy for dealing with multiple version of a BPEL process, to enable new requirements to be introduced, while still preserving the original process definitions associated with existing active process instances.
This is achieved by simply associating a version number with the BPEL process by adding it as a suffix to the BPEL file name. For example, if our BPEL process would normally be located in the file 'HelloWorld.bpel', then we simply add a hyphen followed by the version number, e.g. 'HelloWorld-32.bpel' would indicate that this is the 32nd version of this BPEL process.
When a new version of the BPEL process has been defined, it is packaged in the SwitchYard application, along side the previous versions of the BPEL process. It is important that the older version of the BPEL process remain in the SwitchYard application until there are no longer any active process instances associated with that version.
![]() It is then important that the SwitchYard application is re-deployed, without undeploying the previous version. If the previous version of the SwitchYard application is undeployed, it will cause the BPEL engine to delete all outstanding active instances associated with the process definitions that have bene removed.
It is then important that the SwitchYard application is re-deployed, without undeploying the previous version. If the previous version of the SwitchYard application is undeployed, it will cause the BPEL engine to delete all outstanding active instances associated with the process definitions that have bene removed.
Although the BPEL process is versioned, the WSDL interfaces are not. It is important to ensure that any changes made to the WSDL interfaces are backward compatible, so that both the new and older versions of the BPEL (that still have active process instances) are not affected by the changes.
Structure of a SwitchYard BPEL Application
The following image shows the structure of the say_hello SwitchYard BPEL quickstart:

The important part is how the artifacts are structured within the src/main/resources folder.
The switchyard.xml configuration file is located in the META-INF folder as usual. However the BPEL deployment descriptor (deploy.xml), and the BPEL process definition are located in the root folder.
The WSDL interface definitions, and any accompanying XSD schemas, can be located in sub-folders. If they are, then the BPEL process and SwitchYard BPEL component configuration must define the correct relative path.
Gateway Bindings
SOAP Bindings
The SOAP component in SwitchYard provides SOAP-based web service binding support for services and references in SwitchYard.
Binding Services with SOAP
Composite-level services can be exposed as a SOAP-based web service using the <binding.soap> binding definition. The following configuration options are available for binding.soap when binding services:
-
wsdl : location of the WSDL used to describe the web service endpoint. A relative path can be used if the WSDL is included in the deployed application. If the WSDL is located outside the application, then a file: or http: URL can be used.
-
socketAddr : the IP Socket Address to be used. The value can be in the form hostName/ipAddress:portNumber or hostName/ipAddress or :portNumber.
-
wsdlPort : port name in the WSDL to use. If unspecified, the first port definition in the WSDL is used for the service endpoint
-
contextPath : additional context path for the SOAP endpoint. Default is none.
In AS7 by default the JBossWS-CXF stack is enabled now and hence the socketAddr parameter will be ignored. However this parameter can be used for standalone usage under JDK's JAXWS-RI.
Here's an example of what a SOAP service binding looks like:
<sca:composite name="orders" targetNamespace="urn:switchyard-quickstart-demo:orders:0.1.0">
    <sca:service name="OrderService" promote="OrderService">
        <soap:binding.soap>
            <soap:wsdl>wsdl/OrderService.wsdl</soap:wsdl>
            <soap:socketAddr>:9000</soap:socketAddr>
         </soap:binding.soap>
    </sca:service>
</sca:composite>
Binding References with SOAP
Binding a reference with SOAP can be used to make SOAP-based web services available to SwitchYard services. The following configuration options are available for binding.soap when binding references:
-
wsdl : location of the WSDL used to describe the web service endpoint. A relative path can be used if the WSDL is included in the deployed application. If the WSDL is located outside the application, then a file: or http: URL can be used.
-
wsdlPort : port name in the WSDL to use. If unspecified, the first port definition in the WSDL is used for the service endpoint.
-
endpointAddress : the SOAP endpoint address to override from that specified in the WSDL. Optional property, if not specified will use the one specified in the WSDL.
<sca:composite name="orders" targetNamespace="urn:switchyard-quickstart-demo:orders:0.1.0">
    <sca:reference name="WarehouseService" promote="OrderComponent/WarehouseService" multiplicity="1..1">
         <soap:binding.soap>
            <soap:wsdl>wsdl/OrderService.wsdl</soap:wsdl>
            <soap:endpointAddress>http://www.change.com/toanewendpointurl</soap:endpointAddress>
         </soap:binding.soap>
    </sca:reference>
</sca:composite>
Camel Bindings
Camel binding support in SwitchYard allows Camel components to be used as gateway bindings for services and references within an application.
Binding Services with Camel
Since SwitchYard 0.7 every camel component binding supported by runtime have it's own configuration namespace. However, there is small except. Binding for direct, seda, timer and mock share same namespace urn:switchyard-component-camel-core:config:1.0.
Composite-level services can be bound to a Camel component using the <binding.uri> binding definition. The following configuration options are available for binding.uri:
-
configURI : contains the Camel endpoint URI used to configure a Camel component instance
-
operationSelector : specification of the operation to use for the message exchange. See Operation Selector for more details. This setting is not used for cxfrs configurations.
binding.uri is not linked with any specific component. It allows usage of 3rd party camel components which are not part of distribution.
Before SwitchYard 0.7 binding.camel element was used instead of binding.uri
Here's an example of what a service binding looks like using a Camel component.
<sca:composite name="SimpleCamelService" targetNamespace="urn:userguide:simple-camel-service:0.1.0">
<sca:service name="SimpleCamelService" promote="SimpleComponent/SimpleCamelService">
<camel:binding.uri configURI="file://target/input?fileName=test.txt&initialDelay=50&delete=true">
<selector:operationSelector operationName="print"/>
</camel:binding.uri>
</sca:service>
<!-- sca:component definition omitted -->
</sca:composite>
Binding References with Camel
Binding a reference with Camel is very similar to binding a service. The only significant difference is that specification of the operationSelector is not required on reference bindings. Logically reference elements points to outgoing communication eg. service called by Switchyard.
<sca:composite name="orders" targetNamespace="urn:switchyard-quickstart-demo:orders:0.1.0">
    <sca:reference name="WarehouseService" promote="OrderComponent/WarehouseService" multiplicity="1..1">
        <camel:binding.uri configURI="file://target/output"/>
    </sca:reference>
</sca:composite>
HornetQ Bindings
The HornetQ gateway allows you to send and receive messages via a HornetQ queue.
Binding Services with HornetQ
Composite-level services can be bound to a HornetQ queue using the <binding.hornetq> binding definition. The following configuration options are required for binding.hornetq:
-
connector : provides connection details for communicating with the HornetQ server.
-
operationSelector : specification of the operation name to use for the message exchange. If the target service only has a single operation, this setting is optional.
Additional HornetQ binding configuration options can be found in the HornetQ config schema. Here's an example of what a service binding looks like using a Camel component:
<sca:composite name="HornetQServiceExample" targetNamespace="urn:userguide:hornetq-example-service:0.1.0">
    <sca:service name="HornetQService" promote="SomeService">
        <hornetq:binding.hornetq>
            <hornetq:operationSelector operationName="greet"/>
            <hornetq:config>
                <hornetq:connector>
                   <hornetq:factoryClass>org.hornetq.core.remoting.impl.invm.InVMConnectorFactory</hornetq:factoryClass>
                </hornetq:connector>
                <hornetq:queue>jms.queue.ServiceQueue</hornetq:queue>
            </hornetq:config>
        </hornetq:binding.hornetq>
    </service>
    <!-- sca:component definition omitted -->
</sca:composite>
Binding References with HornetQ
Binding a reference with HornetQ is very similar to binding a service. The only significant difference is that specification of the operationSelector is not required on reference bindings.
<sca:composite name="HornetQReferenceExample" targetNamespace="urn:userguide:hornetq-example-reference:0.1.0">
    <sca:reference name="HornetQReference" promote="SomeComponent/SomeServiceReference" multiplicity="1..1">
        <hornetq:binding.hornetq>
           <hornetq:config>
              <hornetq:connector>
                 <hornetq:factoryClass>org.hornetq.core.remoting.impl.invm.InVMConnectorFactory</hornetq:factoryClass>
              </hornetq:connector>
              <hornetq:queue>jms.queue.ReferenceQueue</hornetq:queue>
           </hornetq:config>
        </hornetq:binding.hornetq>
    </sca:reference>
</sca:composite>
JCA Bindings
The JCA gateway allows you to send and receive messages to/from EIS via JCA ResourceAdapter.
Binding Services with JCA message inflow
Composite-level services can be bound to a EIS with JCA message inflow using the <binding.jca> binding definition. The following configuration options are required for binding.jca:
-
operationSelector : specification of the operation to use for the message exchange. See Operation Selector for more details.
-
inboundConnection
-
resourceAdapter
-
@name : Name of the ResourceAdapter archive. Please make sure the resource adapter has been deployed on JBoss application server before you deploy the SwitchYard application which has JCA binding.
-
-
activationSpec
-
property : Properties to be injected into ActivationSpec instance. Required properties are specific to the ResourceAdapter implementation.
-
-
-
inboundInteraction
-
listener : FQN of the listener interface. When you use JMSEndpoint, javax.jms.MessageListener should be specified. When you use CCIEndpoint, javax.resource.cci.MessageListener should be specified. Otherwise, you may need to specify EIS specific listener interface according to its ResourceAdapter. Note that the endpoint class should implement this listener interface.
-
endpoint
-
@type : FQN of the Endpoint implementation class. There are 2 built-in Endpoint, org.switchyard.component.jca.endpoint.JMSEndpoint and org.switchyard.component.jca.endpoint.CCIEndpoint. Note that these 2 have corresponding listener. If neither JMSEndpoint nor CCIEndpoint is applicable for the EIS you're supposed to bind to, then you need to implement its own Endpoint class according to the ResourceAdapter implementation. The Endpoint class should be a subclass of org.switchyard.component.jca.endpoint.AbstractInflowEndpoint.
-
property : Properties to be injected into Endpoint class. JMSEndpoint has no required property. CCIEndpoint needs connectionFactoryJNDIName property.
-
-
transacted : The boolean value to indicate whether transaction is needed by endpoint or not. True by default.
-
Here's an example of what a JCA service binding looks like. This example binds a service to the HornetQ JMS:
<sca:composite name="JCAInflowExample" targetNamespace="urn:userguide:jca-example-service:0.1.0">
    <sca:service name="JCAService" promote="SomeService">
        <jca:binding.jca>
            <selector:operationSelector operationName="onMessage"/>
            <jca:inboundConnection>
                <jca:resourceAdapter name="hornetq-ra.rar"/>
                <jca:activationSpec>
                    <jca:property name="destinationType" value="javax.jms.Queue"/>
                    <jca:property name="destination" value="ServiceQueue"/>
                </jca:activationSpec>
            </jca:inboundConnection>
            <jca:inboundInteraction>
                <jca:listener>javax.jms.MessageListener</jca:listener>
                <jca:endpoint type="org.switchyard.component.jca.endpoint.JMSEndpoint"/>
                <jca:transacted>true</jca:transacted>
            </jca:inboundInteraction>
        </jca:binding.jca>
    </service>
    <!-- sca:component definition omitted -->
</sca:composite>
Binding References with JCA outbound
Composite-level references can be bound to a EIS with JCA outbound using the <binding.jca> binding definition. The following configuration options are required for binding.jca:
-
outboundConnection
-
resourceAdapter
-
@name : Name of the ResourceAdapter archive. Please make sure the resource adapter has been deployed on JBoss application server before you deploy the SwitchYard application which has JCA binding.
-
-
connection
-
@jndiName : JNDI name which the ConnectionFactory is bound into.
-
-
-
outboundInteraction
-
connectionSpec : Configuration for javax.resource.cci.ConnectionSpec. Note that JMSProcessor doesn't use this option.
-
@type : FQN of the ConnectionSpec implementation class.
-
property : Properties to be injected into ConnectionSpec instance.
-
-
interactionSpec : Configuration for _javax.resource.cci.InteractionSpec. _Note that JMSProcessor doesn't use this option.
-
@type : FQN of the InteractionSpec implementation class.
-
property : Properties to be injected into InteractionSpec instance.
-
-
processor
-
@type : FQN of the class which processes outbound delivery. There are 2 build-in processor, org.switchyard.component.jca.processor.JMSProcessor and org.switchyard.component.jca.processor.CCIProcessor. If neither JMSProcessor nor CCIProcessor is applicable for the EIS you're supposed to bind to, then you need to implement its own processor class according to the ResourceAdapter implementation. Note that this class should be a subclass of org.switchyard.component.jca.processor.AbstractOutboundProcessor.
-
property : Properties to be injected into processor instance. JMSProcessor needs destination property to specify target destination. CCIProcessor needs recordClassName property to specify record type to be used to interact with EIS. If you use CCIProcessor with the record type other than MappedRecord and IndexedRecord, you need to implement corresponding RecordHandler. Please refer to org.switchyard.component.jca.processor.cci.IndexedRecordHandler and org.switchyard.component.jca.processor.cci.MappedRecordHandler.
-
-
Here's an example of what a JCA reference binding looks like. This example binds a reference to the HornetQ JMS:
<sca:composite name="JCAReferenceExample" targetNamespace="urn:userguide:jca-example-reference:0.1.0">
    <sca:reference name="JCAReference" promote="SomeComponent/SomeReference" multiplicity="1..1">
        <jca:binding.jca>
            <jca:outboundConnection>
                <jca:resourceAdapter name="hornetq-ra.rar"/>
                <jca:connection jndiName="java:/JmsXA"/>
            </jca:outboundConnection>
            <jca:outboundInteraction>
                <jca:processor type="org.switchyard.component.jca.processor.JMSProcessor">
                    <jca:property name="destination" value="ReferenceQueue"/>
                </jca:processor>
            </jca:outboundInteraction>
        </jca:binding.jca>
    </sca:reference>
</sca:composite>
RESTEasy Bindings
The RESTEasy component in SwitchYard provides REST-based binding support for services and references in SwitchYard.
Binding Services with RESTEasy
Composite-level services can be exposed as a REST-based service using the <binding.rest> binding definition. The following configuration options are available for binding.rest when binding services:
-
interfaces : A comma seperated list of interfaces or abstract/empty classes with JAX-RS annotations.
-
contextPath : Additional context path for the REST endpoint. Default is none.
Here's an example of what a REST service binding looks like:
<sca:service name="OrderService" promote="OrderService/OrderService">
    <rest:binding.rest>
        <rest:interfaces>org.switchyard.quickstarts.rest.binding.OrderResource,org.switchyard.quickstarts.rest.binding.TestResource</rest:interfaces>
        <rest:contextPath>rest-binding</rest:contextPath>
    </rest:binding.rest>
</sca:service>
Binding References with RESTEasy
Binding a reference with REST can be used to make REST-based services available to SwitchYard services. The following configuration options are available for binding.rest when binding references:
-
interfaces : A comma seperated list of interfaces or abstract/empty classes with JAX-RS annotations.
-
address : A URL that points to the root path of resources. This is only applicable for Reference bindings. It is optional and if not specified will default to http://127.0.0.1:8080/.
-
contextPath : Additional context path for the REST endpoint. Default is none.
Here's an example of what a REST reference binding looks like:
<sca:reference name="Warehouse" promote="OrderService/Warehouse" multiplicity="1..1">
    <rest:binding.rest>
        <rest:interfaces>org.switchyard.quickstarts.rest.binding.WarehouseResource</rest:interfaces>
        <rest:address>http://localhost:8080</rest:address>
        <rest:contextPath>rest-binding</rest:contextPath>
    </rest:binding.rest>
</sca:reference>
In this example above the resource URLs will start from http://localhost:8080/rest-binding.
HTTP Bindings
The HTTP component in SwitchYard provides HTTP-based binding support for services and references in SwitchYard.
Binding Services with HTTP
Composite-level services can be exposed as a HTTP-based service using the <binding.http> binding definition. The following configuration options are available for binding.rest when binding services:
-
operationSelector : specification of the operation to use for the message exchange. See Operation Selector for more details.
-
contextPath : A context path for the HTTP endpoint.
Here's an example of what a HTTP service binding looks like:
<sca:service name="QuoteService" promote="StockService/QuoteService">
    <http:binding.http>
        <selector:operationSelector operationName="getPrice"/>
        <http:contextPath>http-binding/quote</http:contextPath>
    </http:binding.http>
</sca:service>
Binding References with HTTP
Binding a reference with HTTP can be used to make HTTP-based services available to SwitchYard services. The following configuration options are available for binding.http when binding references:
-
address : A URL that points to the HTTP endpoint. It is optional and if not specified will default to http://127.0.0.1:8080/.
-
method : The HTTP method used for invoking the endpoint. Default is GET.
-
contentType : The HTTP Content-Type header that needs to be set on the request.
Here's an example of what a REST reference binding looks like:
<sca:reference name="Symbol" promote="StockService/SymbolService" multiplicity="1..1">
    <http:binding.http>
        <http:address>http://localhost:8080/http-binding/symbol</http:address>
        <http:method>POST</http:method>
        <http:contentType>text/plain</http:contentType>
    </http:binding.http>
</sca:reference>
Transformation
Transformation represents a change to the format and/or representation of a message's content. The representation of a message is simply the Java contract (e.g. java.lang.String, org.example.MyFancyObject) used to access the underlying content. The format of a message refers to the actual structure of the data itself. Examples of data formats include XML, JSON, CSV, and EDI.
Take the following message content:
<MyBook>
  <Chapter1>
  <Chapter2>
</MyBook>
The format of this content is XML. One representation of XML in Java is as a String. Of course, the representation could also be a org.w3c.dom.Document, java.io.InputStream, etc.
String content = "<MyBook>...";
Transformation plays an important role in connecting service consumers and providers, since the format and representation of message content can be quite different between the two. For example, a SOAP gateway binding will likely use a different representation and format for messages than a service offered by a Java Bean. In order to route services from the SOAP gateway to the Bean providing the service, the format and representation of the SOAP message will need to change. Implementing the transformation logic directly in the consumer or provider pollutes the service logic and can lead to tight coupling. SwitchYard allows for the transformation logic to declared outside the service logic and injected into the mediation layer at runtime.
Adding Transformation to Your Application
Transformation of message content is specified in the descriptor of your SwitchYard application (switchyard.xml). The qualified name of the type being transformed from as well as the type being transformed to are defined along with the transformer implementation. This allows transformation to be a declarative aspect of a SwitchYard application, as the runtime will automatically register and execute transfomers in the course of a message exchange.
<transforms>
   <transform.java class="org.switchyard.quickstarts.demos.orders.Transformers"
                   from="{urn:switchyard-quickstart-demo:orders:1.0}submitOrder"
                   to="java:org.switchyard.quickstarts.demos.orders.Order"/>
</transforms>
Content Type Names
Since transformations occur between named types (i.e. from type A, to type B), it's important to understand how the type names are derived. The type of the message is determined based on the service contract, which can be WSDL or Java.
For WSDL interfaces, the message name is determined based on the fully-qualified element name of a WSDL message. Take the following WSDL definition:
<definitions xmlns:tns="urn:switchyard-quickstart:bean-service:1.0">
  <message name="submitOrder">
    <part name="parameters" element="tns:submitOrder"/>
  </message>
  <portType name="OrderService">
    <operation name="submitOrder">
      <input message="tns:submitOrder"/>
    </operation>
  </portType>
</definitions>
This would yield the following message type name based on the message element name defined in the WSDL:
{urn:switchyard-quickstart:bean-service:1.0}submitOrder
When Java interfaces are used for the service contract, the message name consists of the full package name + the class name, prefixed with "java:".
package org.switchyard.example;
public interface OrderService {
    void submitOrder(Order order);
}
The message type name for the submitOrder method in this Java interface would be "java:org.switchyard.example.Order". Occasionally, it can be useful to override the default operation name generated for a Java interface. The @OperationTypes annotation provides this capability by allowing the user to specify the input, output, and/or fault type names used for a Java service interface. For example, if we wanted to accept XML input content without any need for transformation to a Java object model, the OrderService interface could be changed to look like this:
package org.switchyard.example;
@OperationTypes(in = "{urn:switchyard-quickstart:bean-service:1.0}submitOrder")
public interface OrderService {
    void submitOrder(String orderXML);
}
Aside from short-circuiting the requirement for transformation, this annotation can be useful if you want to maintain tight control over the names used for message content.
Java Transfomer
There are two methods available for creating a Java-based transformer in SwitchYard:
-
Implement the org.switchyard.transform.Transfomer interface and add a <transform.java> definition to your switchyard.xml.
-
Annotate one or more methods on your Java class with @Transformer.
When using the @Transformer annotation, the SwitchYard maven plugin will automatically generate the <transform.java> definition(s) for you and add them to the switchyard.xml packaged in your application. The following Java class would produce the <transform.java> definition provided above:
public class MyTransformer {
    @Transformer(from = "{urn:switchyard-quickstart-demo:orders:1.0}submitOrder")
    public Order transform(Element from) {
       // handle transformation here
    }
}
The optional from and to elements of the @Transformer annotation can be used to specify the qualified type name used during transformer registration. If not supplied, the full class name of the method parameter will be used as the from type and the full class name of the return type will be used as the to type.
Smooks Transformer
There are three distinct transformation models available with Smooks in SwitchYard:
-
XML to Java : Based on a standard Smooks Java Binding configuration.
-
Java to XML: Based on a standard Smooks Java Binding configuration.
-
Smooks : This is a "normal" Smooks transformation in which the developer must define which Smooks filtering Result is to be exported back to the SwitchYard Message as the transformation result.
Smooks transformations are declared by including a <transform.smooks> definition in switchyard.xml.
<transform.smooks config="/smooks/OrderAck_XML.xml"
                  from="java:org.switchyard.quickstarts.transform.smooks.OrderAck"
                  to="{urn:switchyard-quickstart:transform-smooks:1.0}submitOrderResponse"
                  type="JAVA2XML"/>
The config attribute points to a Smooks resource containing the mapping definition. The type attribute can be one of SMOOKS, XML2JAVA, or JAVA2XML.
JSON Transformer
The JSON transformer provides a basic mapping facility between POJOs and JSON (JSON marshalling and unmarshalling). Just like the JAXB Transformer, specification of the transformer requires a to and from specification with one Java type and one QNamed JSON type, depending on whether you're performing a Java to JSON or JSON to Java transformation.
The following configuration illustrates a JSON to Java transformation.
<trfm:transform.json
            from="{urn:switchyard-quickstart:transform-json:1.0}order"
            to="java:org.switchyard.quickstarts.transform.json.Order"/>
The following configuration illustrates a Java to JSON transformation of the same types as above.
<trfm:transform.json
            from="java:org.switchyard.quickstarts.transform.json.Order"
            to="{urn:switchyard-quickstart:transform-json:1.0}order"/>
XSLT Transformer
The XSLT transformer allows you to perform a transformation between 2 types, using an XSLT. It is configured simply by specifying the to and from QNames, as well as the path to the XSLT to be applied.
<transform.xslt from="{http://acme/}A" to="{http://acme/}B" xsltFile="com/acme/xslt/A2B.xslt"/>
JAXB Transformer
The JAXB transformer allows you to perform Java to XML (and XML to Java) transformations using JAXB (XML marshalling and unmarshalling). It is exactly like the JSON Transformer in terms of how it is configured i.e. a to and from configuration with one Java type and one QNamed XML type.
JAXB Java Model Creation
JAXB Java models can be generated from an XML Schema using XJC, or from a WSDL using tools like wsconsume (.sh/.bat), which is shipped with both SwitchYard AS6 and AS7 distros (in the bin directory).
JAXB Transformer Configurations
Working out the available transformations is quite simple. Just look in the ObjectFactory class source file (ObjectFactory.java). In this source file you will see factory methods representing the available marshallings/unmarshallings e.g.
@XmlElementDecl(namespace = "http://com.acme/orders", name = "create")
public JAXBElement<CreateOrder> createOrder(CreateOrder value) {
    return new JAXBElement<Order>(_CreateOrder_QNAME, CreateOrder.class, null, value);
}
In the above example, the @XmlElementDecl annotation tells us that the XML QName associated with the com.acme.orders.CreateOrder type is "{http://com.acme/orders}create". From this, we can deduce that we have the following possible SwitchYard JAXB Transformer configurations:
<transform.jaxb from="{http://com.acme/orders}create" to="java:com.acme.orders.CreateOrder" />
<transform.jaxb from="java:com.acme.orders.CreateOrder" to="{http://com.acme/orders}create" />
Automatically Detected JAXB Transformations
One of the nice things about the JAXB Transformer integrations in SwitchYard is the fact that JAXB Transformations are automatically detected and automatically added, for your application deployment. So, if for example, you develop a CDI Bean Service and use JAXB generated types in the Service Interface, you will not need to configure any of the transformations. SwitchYard will automatically detect their availability for your application and will automatically apply them at the appropriate time during service invocation.
Validation
Validation feature provides a functionality for message content validation.
Take the following message content:
<MyBook xmlns="example">
  <Chapter1/>
  <Chapter2/>
</MyBook>
And follwing XML Schema definition:
<?xml version="1.0" encoding="UTF-8"?>
<schema xmlns="http://www.w3.org/2001/XMLSchema"
        targetNamespace="example"
        xmlns:orders="example">
        <element name="MyBook" type="example:MyBook"/>
        <complexType name="MyBook">
            <sequence>
                <element name="Chapter1" type="string"/>
            </sequence>
        </complexType>
</schema>
The XML content is still Well-Formed, but it has a Chapter2 element that is not declared as the child of MyBook element in the XML Schema, So the content is not Valid against this XML Schema. We often need to perform this kind of validation before processing its data in service logic, but implementing the validation logic directly in the consumer or provider pollutes the service logic and can lead to tight coupling. SwitchYard allows for the validation logic to declared outside the service logic and injected into the mediation layer at runtime.
Adding Validation to Your Application
Validation of message content is specified in the descriptor of your SwitchYard application (switchyard.xml). The qualified name of the type being validated name is defined along with the validator implementation. This allows validation to be a declarative aspect of a SwitchYard application, as the runtime will automatically register and execute validators in the course of a message exchange.
<validates>
   <validate.xml schemaType="XML_SCHEMA"
                   name="{urn:example}MyBook
                   schemaFile="/xsd/orders.xsd"/>
</validates>
Content Type Names
Since validations occur with named type (i.e. type A) as well as transformations, it's important to understand how the type names are derived. Please refer to the Content Type Names section in the Transformation chapter if you have not ever seen it.
Java Validator
There are two methods available for creating a Java-based validator in SwitchYard:
-
Implement the org.switchyard.validate.Validator interface and add a <validate.java> definition to your switchyard.xml.
-
Annotate one or more methods on your Java class with @Validator.
When using the @Validator annotation, the SwitchYard maven plugin will automatically generate the <validate.java> definition(s) for you and add them to the switchyard.xml packaged in your application.
public class MyValidator {
    @Validator(name = "{urn:switchyard-quickstart-demo:orders:1.0}submitOrder")
    public boolean validate(Element from) {
       // handle validation here
    }
}
The above Java class would produce the <validate.java> definition as following:
<validate.java class="org.switchyard.quickstarts.demos.orders.MyValidator"
               name="{urn:switchyard-quickstart-demo:orders:1.0}submitOrder"/>
The optional name element of the @Validator annotation can be used to specify the qualified type name used during validator registration. If not supplied, the full class name of the method parameter will be used as the type.
XML Validator
The XML validator allows you to perform a validation against its schema definition. Supported schema types are DTD, XML_SCHEMA, and RELAX_NG. It is configured simply by specifying the schema Type, the name QName, and the path to the schema file.
<validate.xml schemaType="XML_SCHEMA" name="{http://acme/}A" schemaFile="com/acme/xsd/A.xsd"/>
Configuration
Each SwitchYard application must include a configuration descriptor named switchyard.xml in the /META-INF directory of it's archive. The basic structure of this descriptor is:
-
A parent <switchyard> element which contains all other configuration.
-
Exactly one child <composite> element, which contains the SCA description of the application.
-
Zero or one <transforms> elements which can contain one or more transform definitions.
Here's an example of what a SwitchYard descriptor looks like:
<switchyard xmlns="urn:switchyard-config:switchyard:1.0"
            xmlns:sca="http://docs.oasis-open.org/ns/opencsa/sca/200912"
            xmlns:bean="urn:switchyard-component-bean:config:1.0"
            xmlns:soap="urn:switchyard-component-soap:config:1.0">
    <sca:composite name="orders" targetNamespace="urn:switchyard-quickstart-demo:orders:0.1.0">
        <sca:service name="OrderService" promote="OrderService">
            <soap:binding.soap>
                <soap:socketAddr>:18001</soap:socketAddr>
                <soap:wsdl>wsdl/OrderService.wsdl</soap:wsdl>
            </soap:binding.soap>
        </sca:service>
        <sca:component name="InventoryService">
            <bean:implementation.bean class="org.switchyard.quickstarts.demos.orders.InventoryServiceBean"/>
            <sca:service name="InventoryService">
                <sca:interface.java interface="org.switchyard.quickstarts.demos.orders.InventoryService"/>
            </sca:service>
        </sca:component>
        <sca:component name="OrderService">
            <bean:implementation.bean class="org.switchyard.quickstarts.demos.orders.OrderServiceBean"/>
            <sca:service name="OrderService">
                <sca:interface.java interface="org.switchyard.quickstarts.demos.orders.OrderService"/>
            </sca:service>
            <sca:reference name="InventoryService">
                <sca:interface.java interface="org.switchyard.quickstarts.demos.orders.InventoryService"/>
            </sca:reference>
        </sca:component>
    </sca:composite>
    <transforms xmlns="urn:switchyard-config:transform:1.0">
        <transform.java class="org.switchyard.quickstarts.demos.orders.Transformers"
                        from="{urn:switchyard-quickstart-demo:orders:1.0}submitOrder"
                        to="java:org.switchyard.quickstarts.demos.orders.Order"/>
        <transform.java class="org.switchyard.quickstarts.demos.orders.Transformers"
                        from="java:org.switchyard.quickstarts.demos.orders.OrderAck"
                        to="{urn:switchyard-quickstart-demo:orders:1.0}submitOrderResponse"/>
    </transforms>
</switchyard>
Composite
The composition of a SwitchYard application is defined using the Service Component Architecture Assembly Model, an open specification undergoing standardization in OASIS. For the nitty gritty details of the assembly model, please consult the SCA specification. This section provides a brief overview of the important elements:
-
<composite> : single, top-level application element which defines a set of services, the relationships and dependencies of those services, and the linkage (if any) to services available outside the application.
-
<component> : contains the implementation of a service and the dependencies of that service
-
<service> : defines the name and interface for a service. This element is used inside a component definition to declare a service and can also appear inside a composite definition to indicate that a service is visible to outside applications.
-
<interface.XXX> : the contract for a service. The type of the interface replaces 'XXX' in the definition. Supported interface types at this point are "java", "wsdl", and "esb".
-
<binding.XXX> : the binding of a service. The type of the binding replaces 'XXX' in the definition. Example bindings include "binding.soap" and "binding.camel".
-
<implementation.XXX> : the implementation of a service. The type of the implementation replaces 'XXX' in the definition. Example implementations include 'implementation.bean" and "implementation.camel".
Transforms
The <transforms> section of SwitchYard configuration is used to define transformers local to your application. Similar to interfaces, bindings, and implementations, each transformer definition includes a type stuff in it's definition (e.g. transform.java, transform.smooks). The from and to definition on each transformer corresponds to the message type used on a service and/or reference interface used within SwitchYard. See the Transformer section of the User Guide for more information on individual transformer types.
Generated Configuration
As mentioned earlier, SwitchYard is capable of generating configuration off of annotations in your application code so that you don't have to hand edit XML configuration. The generated configuration is packaged up with your application as part of the Maven build lifecycle and placed in
target/classes/META-INF/switchyard.xml
Your application project can also include a descriptor in
src/main/resources/META-INF/switchyard.xml
This version of the configuration can be edited by the user directly and is also used by Forge tooling to specify configuration in response to SwitchYard forge commands. During the build process, the user-editable switchyard.xml is merged with any generated configuration to produce the final switchyard.xml in the target/ directory.
Message Composition
Message Composers
A MessageComposer can compose or decompose a native binding message to/from SwitchYard's canonical message. A MessageComposer does this in three steps:
-
Construct a new target message instance.
-
Copy the content ("body") of the message.
-
Delegate the header/property mapping to a ContextMapper.
We currently provide a SOAPMessageComposer, a CamelMessageComposer, and a HornetQMessageComposer. These default implementations are used by their associated bindings, but can be overridden by the user.
Custom Message Composers
To implement a custom MessageComposer, you need to implement the org.switchyard.component.common.composer.MessageComposer interface:
public interface MessageComposer<T> {
    ContextMapper<T> getContextMapper();
    MessageComposer<T> setContextMapper(ContextMapper<T> contextMapper);
    Message compose(T source, Exchange exchange, boolean create) throws Exception;
    public T decompose(Exchange exchange, T target) throws Exception;
}
-
The getContextMapper() and setContextMapper() methods are just bean properties. If you extend BaseMessageComposer, both of these are implemented for you.
-
Your compose() method needs to take the data from the passed in source native message and compose a SwitchYard Message based on the specified Exchange. The create parameter is whether or not we ask the Exchange to create a new Message, or just get the existing one.
-
Your decompose() method needs to take the data from the SwitchYard Message in the specified Exchange and decompose it into the target native message.
Then, specify your implementation in your switchyard.xml:
<binding.xyz ...>
    <messageComposer class="com.example.MyMessageComposer"/>
</binding.xyz>
Context Mappers
A ContextMapper moves native binding message headers and/or properties to/from SwitchYard's canonical context. We provide many ContextMapper implementations OOTB (see section below). These default implementations are used by their associated bindings, but can be overridden by the user.
Custom Context Mappers
To implement a custom ContextMapper, you need to implement the org.switchyard.component.common.composer.ContextMapper interface:
public interface ContextMapper<T> {
    void mapFrom(T source, Context context) throws Exception;
    void mapTo(Context context, T target) throws Exception;
}
-
Your mapFrom() method needs to map a source native message's properties to the SwitchYard Message's Context.
-
Your mapTo() method needs to map a SwitchYard Message's Context properties into the target native message.
-
If you extend BaseContextMapper, these methods are stubbed-out with no-op implementations so you only have to implement what you want to.
Then, specify your implementation in your switchyard.xml:
<binding.xyz ...>
    <contextMapper class="com.example.MyContextMapper"/>
</binding.xyz>
Alternatively, you can implement the org.switchyard.component.common.composer.RegexContextMapper. The purpose of this interface is to add regular expression support, where you can filter exactly which Context properties get mapped:
public interface RegexContextMapper<T> extends ContextMapper<T> {
    ContextMapper<T> setIncludes(String includes);
    ContextMapper<T> setExcludes(String excludes);
    ContextMapper<T> setIncludeNamespaces(String includeNamespaces);
    ContextMapper<T> setExcludeNamespaces(String excludeNamespaces);
    boolean matches(String name);
    boolean matches(QName qname);
}
-
The setIncludes(), setExcludes(), setIncludeNamespaces() and setExcludeNamespaces() methods are just bean properties. The matches() methods use those bean properties to determine if the specified name or qualified name passes the collective regular expressions.
-
If you extend BaseRegexContextMapper, all of these are implemented for you. Then, in your implementation's mapFrom / mapTo methods, you only need to first check if the property matches before you map it.
If your implementation extends RegexContextMapper, the following additional (regular expression valued) attributes of the <contextMapper/> element become meaningful/respected:
-
includes = Which context property names to include.
-
excludes = Which context property names to exclude.
-
includeNamespaces = Which context property namespaces to include (if the property name is a qualified name).
-
excludeNamespaces = Which context property namespaces to exclude (if the property name is a qualified name).
OOTB Implementation Notes
Note: All of the out-of-the-box implementations below extend BaseRegexContextMapper, thus all can be configured with the regular expression attributes described above.
-
The SOAPContextMapper, when processing an incoming SOAPMessage, takes the mime (in most cases, HTTP) headers from a soap envelope and maps them into the SwitchYard Context as Scope.IN properties with the SOAPComposition.SOAP_MESSAGE_MIME_HEADER label, and takes the soap header elements from the soap envelope and maps them into the SwitchYard Context as Scope.EXCHANGE properties with the SOAPComposition.SOAP_MESSAGE_HEADER label. When processing an outgoing SOAPMessage, it takes the SwitchYard Scope.OUT Context properties and maps them into mime (in most cases, HTTP) headers, and takes the SwitchYard Scope.EXCHANGE Context properties and maps them into the soap envelope as soap header elements.
The SOAPContextMapper has an additional attribute that the other OOTB ContextMappers do not have: soapHeadersType:
<binding.soap>
    <contextMapper includes=".*" soapHeadersType="VALUE"/>
</binding.soap>
The value of soapHeadersType can be CONFIG, DOM, VALUE or XML (and correspond to the enum SOAPHeadersType.CONFIG, DOM, VALUE or XML). With CONFIG, each soap header element is mapped into an org.switchyard.config.Configuration object, with DOM, each soap header element is left as is (a DOM element), with VALUE, just the String value of each soap header element is stored, and with XML, each soap header element is transformed into an XML String.
-
The CamelContextMapper, when processing an incoming CamelMessage, takes the CamelMessage headers and maps them into the SwitchYard Context as Scope.IN properties with the CamelComposition.CAMEL_MESSAGE_HEADER label, and takes the Camel Exchange properties and maps them into the SwitchYardContext as Scope.EXCHANGE properties with the CamelComposition.CAMEL_EXCHANGE_PROPERTY label. When processing an outgoing CamelMessage, it takes the SwitchYard Scope.OUT Context properties and maps them into the CamelMessage as headers, and takes the SwitchYard Scope.EXCHANGE Context properties and maps them into the Camel Exchange as properties.
-
The HornetQContextMapper, when processing an incoming ClientMessage, takes the ClientMessage properties and maps them into the SwitchYardContext as Scope.EXCHANGE properties with the HornetQCompsition.HORNETQ_MESSAGE_PROPERTY label. When procesing an outgoing ClientMessage, it takes the SwitchYard Scope.EXCHANGE Context properties and maps them into the ClientMessage as properties. There is no concept of "headers" in a HornetQ ClientMessage.
-
The HTTPContextMapper, when processing an incoming HTTP request, takes the incoming request headers and maps them into the SwitchYard Context as Scope.IN with the HttpComposition.HTTTP_HEADER label. When processing an outgoing HTTP response, it takes the SwitchYard Scope.OUT Context properties and maps them into the response headers.
-
The RESTEasyContextMapper, when processing an incoming HTTP request, takes the incoming request headers and maps them into the SwitchYard Context as Scope.IN with the RESTEasyComposition.HTTP_HEADER label. When processing an outgoing HTTP response, it takes the SwitchYard Scope.OUT Context properties and maps them into the response headers.
-
The JCA Component actually has 3 different ContextMappers:
-
The CCIIndexedRecordContextMapper, when processing an incoming IndexedRecord, takes the record name and record short description and maps them into the SwitchYardContext as Scope.EXCHANGE properties with the JCAComposition.JCA_MESSAGE_PROPERTY label. When processing an outgoing IndexedRecord, it looks for those properties specifically in the SwitchYard.EXCHANGE Context properties by key and sets them on the IndexedRecord.
-
The CCIMappedRecordContextMapper, when processing an incoming MappedRecord, takes the record name and record short description and maps them into the SwitchYardContext as Scope.EXCHANGE properties with the JCAComposition.JCA_MESSAGE_PROPERTY label. When processing an outgoing MappedRecord, it looks for those properties specifically in the SwitchYard.EXCHANGE Context properties by key and sets them on the MappedRecord.
-
The JMSContextMapper, when processing an incoming (JMS) Message, takes the Message properties and maps them into the SwitchYardContext as Scope.EXCHANGE properties with the JCAComposition.JCA_MESSAGE_PROPERTY label. When processing an outgoing (JMS) Message, it takes the SwitchYard.EXCHANGE Context properties and maps them into the Message as Object properties.
-
The reasoning of scoping headers as IN and OUT scopes was modeled after the notion of http headers, where you will see some headers specifically useful for http requests, and other headers specifically useful for http responses. In both cases, they are most likely tied to the binding's notion of an incoming message or an outgoing message.
The reasoning of scoping properties as EXCHANGE scope came from the idea that this is most likely application or domain data, and possibly useful in the entire processing of the Exchange. An example of this would be a processInstanceId when using the BPM Component.
Operation Selector
OperationSelector provides a capability to determine which service operation should be invoked for the message exchange. The following options are available. If the target service only has a single operation, this setting is optional.
Static Operation Selector
specify a operation name in the configuration.
<hornetq:binding.hornetq>
    <selector:operationSelector operationName="greet"/>
(... snip ...)
</hornetq:binding.hornetq>
XPath Operation Selector
specify a XPath location which contains a operation name to be invoked in the message contents.
If the configuration looks like this:
<jca:binding.jca>
    <selector:operationSelector.xpath expression="//person/language"/>
(... snip ...)
</jca:binding.jca>
And the message content is like this:
<person>
    <name>Fernando</name>
    <language>spanish</language>
</person>
Then operation spanish() would be invoked.
Regex Operation Selector
specify a Regular Expression to find a operation name to be invoked in the message contents.
If the configuration looks like this:
<http:binding.http>
    <selector:operationSelector.regex expression="[a-zA-Z]*Operation"/>
(... snip ...)
</http:binding.http>
And the message content is like this:
xxx yyy zzz regexOperation aaa bbb ccc
Then operation regexOperation() would be invoked.
Java Operation Selector
specify a Java class which is able to determine the operation to be invoked.
configuration should look like this:
<jca:binding.jca>
    <selector:operationSelector.java class="org.switchyard.example.MyOperationSelectorImpl"/>
(... snip ...)
</jca:binding.jca>
Note that the org.switchyard.example.MyOperationSelectorImpl needs to be a subclass of org.switchyard.component.common.selector.OperationSelector or other concrete OperationSelector classes for each service bindings. You can override the selectOperation() method as you like.
Default OperationSelector implementation for each service bindings are following:
-
Camel : org.switchyard.component.camel.selector.CamelOperationSelector
-
JCA/JMS : org.switchyard.component.jca.selector.JMSOperationSelector
-
JCA/CCI : org.switchyard.component.jca.selector.CCIOperationSelector
-
HTTP : org.switchyard.component.http.selector.HttpOperationSelector
Scope of Support
Support for operation selector is limited to Camel, JCA and HTTP service bindings. Support for other service bindings will be added in the future.
Testing
Testing your applications is dead simple with the comprehensive unit test support provided in SwitchYard. There are three primary elements to test support in SwitchYard:
-
SwitchYardRunner: JUnit test Runner class which takes care of bootstrapping an embedded SwitchYard runtime and deploying a SwitchYard application for the test instance. Its behavior is influenced heavily by the optional SwitchYardTestCaseConfig annotation. Its runtime state is represented by the SwitchYardTestKit.
-
SwitchYardTestKit: represents the runtime state of the deployed SwitchYard application instance deployed by SwitchYardRunner. Also provides access to a set of test utility methods for the test (e.g. assertion methods). The SwitchYardTestKit is reflectively injected into the test instance, if a property of type SwitchYardTestKit is declared in the test.
-
SwitchYardTestCaseConfig: optional annotation allows additional information to be specified for controlling the behavior of the SwitchYardRunner.
Enabling Test Support
Adding test support to your SwitchYard application is simply a matter of adding a dependency to the switchyard-test module in your application's pom.xml.
<dependency>
    <groupId>org.switchyard</groupId>
    <artifactId>switchyard-test</artifactId>
    <version>[release-version]</version> <!-- e.g. "0.7.0" -->
    <scope>test</scope>
</dependency>
In addition to a dependency on the core test framework, you might want to take advantage of MixIns in your test classes. Dependency information for each MixIn is listed under the Test MixIns section.
SwitchYardRunner and SwitchYardTestKit
To take advantage of the test support in SwitchYard, your unit test should be annotated with the SwitchYardRunner JUnit test Runner class. SwitchYardRunner takes care of creating and starting an embedded runtime for each test method. After the embedded runtime is started, the project containing the test is packaged as a SwitchYard application and deployed to it. The runtime state of the deployed SwitchYard test application is represented by an instance of the SwitchYardTestKit class, which is injected into the test when a property of type SwitchYardTestKit is declared in the test.
@RunWith(SwitchYardRunner.class)
public class MyServiceTest  {

    private SwitchYardTestKit testKit;

    @Test
    public void testOperation() {
        MyTestServiceHandler service = new MyTestServiceHandler();

        // register the service...
        testKit.registerInOutService("MyService", service);

        // invoke the service and capture the response...
        Message response = newInvoker("MyService")
        .sendInOut("<create>A1234</create>");

        // test the response content by doing an XML comparison with a
        // file resource on the classpath...
        testKit.compareXMLToResource(response.getContent(String.class), "/myservice/expected-create-response.xml");
    }

    private class MyTestServiceHandler implements ExchangeHandler {
        // implement methods....
    }
}
The SwitchYardTestKit provides a set of utility methods for performing all sorts of deployment configuration and test operations.
SwitchYardTestCaseConfig
The optional SwitchYardTestCaseConfig annotation can be used control the behavior of the SwitchYardRunner:
-
config: allows the specification of a SwitchYard XML configuration file (switchyard.xml) for the test. The SwitchYardRunner will attempt to load the specified configuration from the classpath. If if fails to locate the config on the classpath, it will then attempt to locate it on the file system (e.g. within the project structure).
-
mixins: composition-based method for adding specific testing tools to your test case. Each TestMixIn provides customized testing tools for things like service implementations, gateway bindings, and transformers. When a TestMixIn is annotated on a Test Class, the SwitchYardRunner handles all the initialization and cleanup (lifecycle) of the TestMixIn instance(s). It's also possible to manually create and manage TestMixIn instance(s) within your test class if (for example) you are not using the SwitchYardRunner.
-
scanners: add classpath scanning as part of the test lifecycle. This adds the same Scanner behavior as is available with the SwitchYard maven build plugin, but allows the scanning to take place as part of the test lifecycle. You will often find that you need to add Scanners if you want your test to run inside your IDE. This is because running your test inside your IDE bypasses the whole maven build process, which means the build plugin does not perform any scanning for you.
@RunWith(SwitchYardRunner.class)
@SwitchYardTestCaseConfig(config = "testconfigs/switchyard-01.xml", mixins = {CDIMixIn.class, BPMMixIn.class}, scanners = {BeanSwitchYardScanner.class, TransformSwitchYardScanner.class})
public class MyServiceTest  {

    @Test
    public void testOperation() {
        newInvoker("OrderService")
        .operation("createOrder")
        .sendInOnly("<order><product>AAA</product><quantity>2</quantity></order>");
    }
}
TestMixIns
The TestMixIn feature allows you to selectively enable additional test functionality based on the capabilities of your application. To include MixIn support in your application, you must include a Maven dependency in your application's pom.xml.
<dependency>
    <groupId>org.switchyard.components</groupId>
    <artifactId>switchyard-component-test-mixin-name</artifactId>
    <version>release-version</version> <!-- e.g. "0.7.0" -->
    <scope>test</scope>
</dependency>
-
CDIMixIn (switchyard-component-test-mixin-cdi) : boostraps a stand-alone CDI environment, automatically discovers CDI beans, registers bean services, and injects references to SwitchYard services.
-
HTTPMixIn (switchyard-component-test-mixin-http) : client methods for testing HTTP-based services.
-
SmooksMixIn (switchyard-component-test-mixin-smooks) : stand-alone testing of any Smoooks transformers in your application.
-
BPMMixIn (switchyard-component-test-mixin-bpm) : utility methods for working with jBPM 5 Human Tasks (like starting/stopping a TaskServer).
-
HornetQMixIn (switchyard-component-test-mixin-hornetq) : bootstraps a stand-alone HornetQ server and provides utility methods to interact with it for testing purpose. It can be also used to interact with remote HornetQ server.
-
JCAMixIn (switchyard-component-test-mixin-jca) : bootstraps a embedded IronJacamar JCA container and provides utility methods to interact with it for testing purpose. It has a MockResourceAdapter feature to simulate the SwitchYard application behavior without connecting to the real EIS systems.
-
NamingMixIn (switchyard-component-test-mixin-naming) : provides access to naming and JNDI services within an application.
Scanners
Scanners add classpath scanning as part of the test lifecycle. This adds the same Scanner behavior as is available with the SwitchYard maven build plugin, but allows the scanning to take place as part of the test lifecycle. The following Scanners are available:
-
BeanSwitchYardScanner: Scans for CDI Bean Service implementations.
-
TransformSwitchYardScanner: Scans for Transformers.
-
BpmSwitchYardScanner: Scans for @Process, @StartProcess, @SignalEvent and @AbortProcessInstance annotations.
-
RouteScanner: Scans for Camel Routes.
-
RulesSwitchYardScanner: Scans for @Rule annotations.
Metadata and Support Class Injections
As shown above, injecting the SwitchYardTestKit instance into the test at runtime is simply a case of declaring a property of that type in the test class.
@RunWith(SwitchYardRunner.class)
public class MyServiceTest  {

    private SwitchYardTestKit testKit;

    // implement test methods...
}
The SwitchYard test framework also injects other test support and metadata classes, which we outline in the following sections.
Deployment Injection
The Deployment instance can be injected by declaring a property of type Deployment.
@RunWith(SwitchYardRunner.class)
public class MyServiceTest  {

    private Deployment deployment;

    // implement test methods...
}
SwitchYardModel Injection
The SwitchYardModel instance can be injected by declaring a property of type SwitchYardModel.
@RunWith(SwitchYardRunner.class)
public class MyServiceTest  {

    private SwitchYardModel model;

    // implement test methods...
}
ServiceDomain Injection
The ServiceDomain instance can be injected by declaring a property of type ServiceDomain.
@RunWith(SwitchYardRunner.class)
public class MyServiceTest  {

    private ServiceDomain serviceDomain;

    // implement test methods...
}
TransformerRegistry Injection
The TransformerRegistry instance can be injected by declaring a property of type TransformerRegistry.
@RunWith(SwitchYardRunner.class)
public class MyServiceTest  {

    private TransformerRegistry transformRegistry;

    // implement test methods...
}
TestMixIn Injection
TestMixIn instance(s) can be injected by declaring properties of the specific type TestMixIn type.
@RunWith(SwitchYardRunner.class)
@SwitchYardTestCaseConfig(mixins = {CDIMixIn.class, HTTPMixIn.class})
public class MyServiceTest  {

    private CDIMixIn cdiMixIn;
    private HTTPMixIn httpIn;

    // implement test methods...
}
Invoker Injection
Service Invoker instance(s) can be injected by declaring properties of type Invoker and annotating them with @ServiceOperation annotation.
@RunWith(SwitchYardRunner.class)
@SwitchYardTestCaseConfig(config = "testconfigs/switchyard-01.xml")
public class MyServiceTest  {

    @ServiceOperation("OrderService.createOrder")
    private Invoker createOrderInvoker;

    @Test
    public void test_createOrder() {
        createOrderInvoker.sendInOnly("<order><product>AAA</product><quantity>2</quantity></order>");
    }
}
Note the annotation value is a dot-delimited Service Operation name of the form "service-name.operation-name".
Selectively Enabling Activators for a Test
The test framework defaults to a mode where the entire application descriptor is processed during a test run. This means all gateway bindings and service implementations are activated during each test. There are times when this may not be appropriate, so we allow activators to be selectively enabled or disabled based on your test configuration.
The following example excludes SOAP bindings from all tests. This means that SOAP gateway bindings will not be activated when the test framework loads the application.
@RunWith(SwitchYardRunner.class)
@SwitchYardTestCaseConfig(config = "testconfigs/switchyard-01.xml" exclude="soap")
public class NoSOAPTest  {
   ...
}
This example includes only CDI bean services defined in the application descriptor.
@RunWith(SwitchYardRunner.class)
@SwitchYardTestCaseConfig(config = "testconfigs/switchyard-02.xml" include="bean")
public class BeanServicesOnlyTest  {
...
}
Preparing procedure for the Test
Sometimes we need to add some procedures before test is performed. JUnit @Before operation is invoked right after the application is deployed, however, it can't be used if you expect something before deploy. We have @BeforeDeploy annotation for this purpose. This is required to test the application which has JCA binding with using JCAMixIn since the ResourceAdapter must be deployed before the application is activated.
This is the example for deploying HornetQ ResourceAdapter to the embedded IronJacamar JCA Container using JCAMixIn.
@BeforeDeploy
public void before() {
    ResourceAdapterConfig ra = new ResourceAdapterConfig(ResourceAdapterConfig.ResourceAdapterType.HORNETQ);
    _jcaMixIn.deployResourceAdapters(ra);
}
Deployment
Available Runtimes
SwitchYard supports the following deployment options:
-
SwitchYard AS7 (JBoss AS7 with SwitchYard pre-installed)
-
Servlet Container (.war) deployment.
SwitchYard AS7
Things are a bit different in SwitchYard AS7 (based on JBoss AS7). Auto-deploy still exists, but there are some subtle changes to the process. Deploy is still just a matter of copying the archive to the server, but the target directory should be standalone/deployments.
cp myapp.jar $JBOSS_HOME/standalone/deployments/.
To undeploy the application, you need to remove the .deployed marker file that is generated upon successful deployment of your application:
rm $JBOSS_HOME/standalone/deployments/myapp.jar.deployed
Web Archive Deployments on SwitchYard AS7
The following guidelines/tips apply when deploying Web Archive (.war) based SwitchYard deployments on a SwitchYard AS7 distribution.
See the "orders" quickstart (in the demos folder) as an example of .war deployment on SwitchYard AS7.
Application Dependencies
When running on SwitchYard AS7, remember that all the SwitchYard dependencies are provided by the container, so there's no need to bundle them inside your applications .war file. If using maven to build your application, simply set <scope>provided</scope> on all the SwitchYard dependencies.
SwitchYard Maven Plugin Configuration
Some maven POM tweaks are required when using both the switchyard-plugin and maven-war-plugin plugins to build a SwitchYard deployable .war file. By default, the switchyard-plugin expects the base switchyard.xml file to be located at src/main/resources/META-INF/ within your maven project structure. This results in the maven-war-plugin putting the generated switchyard.xml (base switchyard.xml + scanned additions) into WEB-INF/classes/META-INF/ in the generated .war artifact. This is fine when deploying a .war file on Tomcat (or other pure Servlet Container), but not when deploying on SwitchYard AS7, because the SwitchYard AS7 deployer is what's doing the SwitchYard deployment work. When deploying a .war on SwitchYard AS7, we need the generated switchyard.xml to be in META-INF/ , where it can be located by the SwitchYard AS7 deployer.
In order to do this we need to move away from the defaults a little bit. We need to locate the base switchyard.xml somewhere other than in src/main/resources/META-INF/, and configure the switchyard-plugin and maven-war-plugin accordingly. Lets assume we put the base switchyard.xml in src/main/webResources/META-INF/:
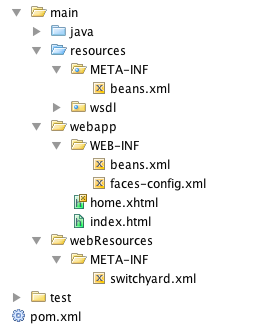
SwitchYard AS7 Web Application Maven Project Structure
The POM configuration changes (away from the default) to the switchyard-plugin and maven-war-plugin plugins would be as follows:
<project xmlns="http://maven.apache.org/POM/4.0.0" xmlns:xsi="http://www.w3.org/2001/XMLSchema-instance"
         xsi:schemaLocation="http://maven.apache.org/POM/4.0.0 http://maven.apache.org/xsd/maven-4.0.0.xsd">
    <modelVersion>4.0.0</modelVersion>

    ...

    <build>
        <plugins>

            ...

            <plugin>
                <groupId>org.switchyard</groupId>
                <artifactId>switchyard-plugin</artifactId>
                <version>0.3.0-SNAPSHOT</version>
                <configuration>
                    <scannerClassNames>
                        <param>org.switchyard.component.bean.config.model.BeanSwitchYardScanner</param>
                        <param>org.switchyard.transform.config.model.TransformSwitchYardScanner</param>
                        ...
                    </scannerClassNames>
                    <!--
                        Specify specific scan directories to reflect the new location of the
                        base switchyard.xml ...
                    -->
                    <scanDirectories>
                        <param>target/classes</param>
                        <param>src/main/webResources</param>
                    </scanDirectories>
                    <!--
                        Specify different output directory for the generated switchyard.xml because we don't
                        want it ending up in WEB-INF/classes/META-INF.  The maven-war-plugin is configured to
                        pick up the generated switchyard.xml from this new location...
                    -->
                    <outputDirectory>target/switchyard_xml</outputDirectory>
                </configuration>
                <executions>
                    <execution>
                        <goals>
                            <goal>configure</goal>
                        </goals>
                    </execution>
                </executions>
            </plugin>
            <plugin>
                <artifactId>maven-war-plugin</artifactId>
                <version>2.1.1</version>
                <configuration>
                    <!-- Java EE 6 doesn't require web.xml, Maven needs to catch up! -->
                    <failOnMissingWebXml>false</failOnMissingWebXml>
                    <webResources>
                        <resource>
                            <!--
                                Pick up the generated switchyard.xml from location specified by
                                the switchyard-plugin...
                            -->
                            <directory>target/switchyard_xml</directory>
                        </resource>
                    </webResources>
                </configuration>
            </plugin>

            ...

        </plugins>
    </build>
</project>
See the "orders" quickstart (in the demos folder) as an example of .war deployment on SwitchYard AS7.
Servlet Container Deployment
SwitchYard provides a Servlet <listener-class> in support for deploying SwitchYard applications in a Java EE Web Application Container such as Tomcat or Jetty. To use this component, you simply need to include the switchyard-deploy-webapp artifact as a dependency on your web application project.
<dependency>
    <groupId>org.switchyard</groupId>
    <artifactId>switchyard-deploy-webapp</artifactId>
    <version>XXX</version> <!-- SwitchYard release version e.g. 0.3.0 -->
</dependency>
You then need to add the WebApplicationDeployer class as a Servlet <listener-class> in your application's web.xml file.
<web-app id="WebApp_9" version="2.4" xmlns="http://java.sun.com/xml/ns/j2ee"
         xmlns:xsi="http://www.w3.org/2001/XMLSchema-instance"
         xsi:schemaLocation="http://java.sun.com/xml/ns/j2ee http://java.sun.com/xml/ns/j2ee/web-app_2_4.xsd">

    <listener>
        <listener-class>org.switchyard.deployment.WebApplicationDeployer</listener-class>
    </listener>

    <!-- etc... -->

</web-app>
The WebApplicationDeployer class looks for a switchyard.xml file at WEB-INF/classes/META-INF/switchyard.xml, so if you are using maven to build your Web Application, you need to put your switchyard.xml in the resources/META-INF folder (i.e. not in webapp/META-INF). Your basic project structure should look as follows.

Generic Servlet Container Web Application Maven Project Structure
Once you've made these configurations, the process of creating the Web Application is no different to developing any other Web Application. Note however that, since this is only a new feature in version 0.3.0, we have tested only a very limited set of use cases:
-
A Basic SwitchYard .war deployment:
-
With all dependencies bundled in the application.
-
Deployable on Tomcat (and, in theory, on Jetty).
-
CDI Bean Services.
-
SOAP binding on the CDI Bean Service.
-
No JSF web ui components.
-
See the "webapp-deploy" quickstart (in the demos).
-
-
A more detailed SwitchYard .war deployment:
-
Without any dependencies bundled in the application and structured to work on the SwitchYard AS7 distribution.
-
Deployable on the SwitchYard AS7 distribution (Not deployable on Tomcat or Jetty).
-
More detailed CDI Bean Service.
-
SOAP binding on the CDI Bean Service.
-
JSF web ui interface on the CDI Bean Service. For more information on building a JSF interface on top of your SwitchYard CDI Bean Services, see the Bean Services documentation.
-
See the "orders" quickstart (in the demos).
-
Policy
Policy allows you to control the runtime behavior of a service in a declarative manner, independent of the service implementation and binding details. For example, you may require that a service always participates in a global transaction. One way to achieve this would be to add logic to your service implementation which checks the current transaction state, associates with an active global transaction, and handles error cases such as when a global transaction does not exist. Of course, this pollutes your application logic with runtime details and also makes the service implementation less flexible - any time you want to change the transactional behavior, you have to change the service implementation. Another way to satisfy the transaction policy would be to ensure that the gateway used to expose the service is transactional and that it propagates the transaction to the service implementation. The problem with this approach is that there is no explicit constraint defined for transactionality, so if the binding configuration changes between environments or the service is repackaged into another application, you could unintentionally violate your constraint that the service must participate in a global transaction. Policy support addresses this problem by allowing you to express these requirements in your application configuration outside of the service implementation and binding configuration. These policy definitions are picked up by the runtime during deployment and enforced on a per-message basis as services are invoked.
Configuring Policy
There are two aspects to a Policy definition:
-
What policy does the service provider require?
-
What policy support does the service consumer provide?
You define the policy that a service requires by annotating the service's configuration in the SwitchYard application descriptor. You also define how a service is consumed (e.g. through a gateway binding), which effectively determines how the policy requirements are satisfied (or provided). The runtime will take care of determining whether the consumer satisfies the policy requirements by evaluating the configuration of the application and the runtime state of the messages exchanged between the consumer and provider.
Take the following example configuration:
<composite name="policy-transaction">
<service name="WorkService" promote="WorkService">
<camel:binding.camel configURI="jms://policyQSTransacted?connectionFactory=%23JmsXA&transactionManager=%23jtaTransactionManager&transacted=true"/>
<camel:binding.camel configURI="jms://policyQSNonTransacted?connectionFactory=#ConnectionFactory"/>
</service>
<component name="WorkService">
<implementation.bean class="org.switchyard.quickstarts.demo.policy.transaction.WorkServiceBean" requires="managedTransaction.Global"/>
<service name="WorkService" requires="propagatesTransaction">
<interface.java interface="org.switchyard.quickstarts.demo.policy.transaction.WorkService"/>
</service>
<reference name="TaskAService" requires="propagatesTransaction">
<interface.java interface="org.switchyard.quickstarts.demo.policy.transaction.TaskAService"/>
</reference>
</component>
</composite>
The service has declared that it requires a global transaction by including the requires attribute with a value of "propagatesTransaction". This service is available at two distinct JMS endpoints - one is configured to provide a transaction (policyQSTransacted) and the other is not (policyQSNonTransacted). When messages are sent to the policyQSTransacted queue, the service is invoked in the context of a global transaction. When messages are sent to the policyQSNonTransacted queue, the SwitchYard runtime rejects the message because it violates the policy requirements of the service (there is no transaction).
The provided policy is actually set at runtime by the Camel component in this scenario. An alternate option that is not yet implemented would allow the provided policy to be directly set on the binding in the configuration. Each component would be responsible for interpreting this policy declaration and configuring itself accordingly. This allows for policy configuration errors to be caught at deployment time instead of runtime.
Interaction Policy and Implementation Policy
There are two parts to be marked by policies using requires attribute. Interaction Policy is allowed on component service and component reference. Implementation Policy is allowed on component implementation. Each policy belongs to one of these. Implementation Policy is NOT allowed to be marked on component service nor component reference, and Interaction Policy is NOT allowed to be marked on component implementation.
Transaction Policy
Transaction Interaction Policy
Transaction Interaction Policy is specified using the requires attribute of a component service or component reference definition.
<service name="WorkService" requires="propagatesTransaction">
Valid values for transaction interaction policy are:
-
propagatesTransaction - indicates that a global transaction is required when a service is invoked. If no transaction is present, the SwitchYard runtime will generate an error.
-
suspendsTransaction - if a transaction is present, the transaction is suspended before the service implementation is invoked and resumed after the invocation. This policy setting allows the transactional context of a gateway binding to be separated from the transactional context of the service implementation (e.g. a rollback in the service implementation will not impact the transaction used to receive a message from a JMS queue).
Transaction Implementation Policy
Transaction Implementation Policy is specified using the requires attribute of a component implementation definition.
<implementation.bean class="org.switchyard.quickstarts.demo.policy.transaction.WorkServiceBean" requires="managedTransaction.Global"/>
Valid values for transaction implementation policy are:
-
managedTransaction.Global - indicates that this service implementation runs under global transaction. If no transaction is present, the SwitchYard runtime will create a new JTA transaction before the execution. Created transaction will be committed by SwitchYard runtime at the end of service execution.
-
managedTransaction.Local - indicates that this service implementation runs under local transaction containment. If transaction exists, SwitchYard runtime suspends it. And SwitchYard always create a new JTA transaction before the execution. Created transaction will be committed and suspended transcation will be resumed by SwitchYard runtime after the invocation. Note that since the local transaction containment doesn't propagate its transaction through the reference, all of the component reference must be marked as suspendsTransaction. If not, SwitchYard will generate an error.
-
noManagedTransaction - indicates that this service implementation runs under no managed transaction. If transaction exists, SwitchYard runtime suspends it before the service implementation is invoked and resumed after the invocation.
Setting Transaction Policy
Transaction policy can be specified by editing the SwitchYard application descriptor (switchyard.xml) and adding the requires attribute to a service/reference definition. Another option is to use the @Requires attribute in your service implementation to declare service interaction and implementation policy for the service. When the application project is built, SwitchYard will discover @Requires annotations and automatically generated the required configuration.
@Service(WorkService.class)
@Requires(transaction = {TransactionPolicy.PROPAGATES_TRANSACTION,TransactionPolicy.MANAGED_TRANSACTION_GLOBAL})
public class WorkServiceBean
    implements org.switchyard.quickstarts.demo.policy.transaction.WorkService {
}
And @Requires annotations could be used to declare reference interaction policy as well.
@Inject @Reference @Requires(transaction = TransactionPolicy.PROPAGATES_TRANSACTION)
private TaskAService _taskAService;
Scope of Support
Support for transaction policy is limited to bean services (implementation.bean), bpm services (implementation.bpm), JCA inflow in the JCA Gateway (binding.jca) and JMS endpoints in the Camel gateway (binding.camel). Support for other implementation types and gateways will be added in the future.
Security Policy
Security Policy is specified using the requires attribute of a component service definition.
<service name="WorkService" requires="clientAuthentication confidentiality">
Valid values for security policy are:
-
clientAuthentication - indicates that the client has been authenticated when a service is invoked. If the associated authenticated user Principal is not available, the SwitchYard runtime will generate an error.
-
confidentiality - indicates that the request has been made over a secure channel. An example of this is when a SOAP request is made over SSL. If confidentiality cannot be verified, the SwitchYard runtime will generate an error.
Setting Security Policy
Security policy can be specified by editing the SwitchYard application descriptor (switchyard.xml) and adding the requires attribute to a service definition. Another option is to use the @Requires attribute in your service implementation to declare security policy for the service. When the application project is built, SwitchYard will discover @Requires annotations and automatically generated the required configuration.
@Service(WorkService.class)
@Requires(security = {SecurityPolicy.CLIENT_AUTHENTICATION, SecurityPolicy.CONFIDENTIALITY})
public class WorkServiceBean
    implements org.switchyard.quickstarts.demo.policy.security.WorkService {
}
Security Processing
When the container does not automatically provide certain security policies, SwitchYard can be configured to process security credentials extracted from the binding-specific data, then provide certain security policies itself (like clientAuthentication). See the Security section of the documentation for details.
Scope of Support
Support for security policy is limited to bean services (implementation.bean), SOAP endpoints via the SOAP gateway (binding.soap), and HTTP endpoints via the HTTP gateway (binding.http). Support for other implementation types and gateways will be added in the future.
Security
SwitchYard services can be secured by:
-
Specifying a list of security policies that are required for that service. See the Security Policy section of the documentation for details.
-
Configuring the security processing details for the services within a domain. See Security Configuration below for details.
Security Configuration
All services within a domain share the same security configuration, which is specified in META-INF/switchyard.xml:
<switchyard>
    <domain>
        <security callbackHandler="callback-handler-class-name" moduleName="jaas-domain-name" rolesAllowed="users, administrators" runAs="leaders">
            <properties>
                <property name="property-name" value="property-value"/>
            </properties>
        </security>
    </domain>
</switchyard>
The <security> Element
This is an optional element. If not specified, the callbackHandler and moduleName attributes described below will fallback to their default values.
The callbackHandler Attribute
This is an optional attribute. If not specified, a default value of org.switchyard.security.callback.NamePasswordCallbackHandler will be used. See the Callback Handlers section below for details o CallbackHandlers.
The moduleName Attribute
This is an optional attribute. If not specified, a default value of other will be used. The value maps to a JAAS security domain name. See the Login Modules section below for details on LoginModules.
The rolesAllowed Attribute
This is an optional attribute. If specified, and if a Service has an authorization security policy requirement, the authenticated user must be in one of the roles listed. The value is a comma-separated list of roles (whitespace gets trimmed).
The runAs Attribute
This is an optional attribute. If specified, the value of this attribute will be added as a role to the authenticated user.
The <properties> and <property> Elements
A <security> element can optionally specify a <properties> element, which can optionally specify zero to many (0..*) <property> elements. Each <property> element has two required attributes: name and value.
The list of specified name/value properties are made available to the SwitchYard Security configuration, as well as the configured callbackHandler. Some CallbackHandlers require configuration information beyond what can be assumed in a no-argument constructor. See the individual CallbackHandler implementations for details.
Callback Handlers
The following is a list of available CallbackHandlers, all within the org.switchyard.security.callback java package:
NamePasswordCallbackHandler
Provides name and password credentials to a configured LoginModule stack. For example, the UsersRoles LoginModule that comes out-of-the-box in JBoss AS7.
STSTokenCallbackHandler
Provides assertion credentials to a configured LoginModule stack. For example, the PicketLink STSValidatingLoginModule that comes out-of-the-box in JBoss AS7.
STSIssueCallbackHandler
Wraps both the NamePasswordCallbackHandler and the STSTokenCallbackHandler, so as to provide name, password and assertion credentials to a configured LoginModule stack. For example the UsersRoles LoginModule and STSIssuingLoginModule that comes out-of-the-box in JBoss AS7.
CertificateCallbackHandler
Provides Certificate credentials to a configured LoginModule stack. SwitchYard 0.7+ provides a CertificateLoginModule for this purpose.
Login Modules
In JBoss AS7, JAAS LoginModules can be stacked underneath a single security domain, and other is available out-of-the-box. Here is an example that could be added to jboss-as7/standalone/configuration/standalone.xml:
<server>
    <profile>
        <subsystem xmlns="urn:jboss:domain:security:1.1">
            <security-domains>
                <security-domain name="jaas-domain-name" cache-type="default">
                    <authentication>
                        <login-module code="login-module-class-name-or-shorthand-name" flag="required">
                            <module-option name="option-name" value="option-value"/>
                        </login-module>
                    </authentication>
                </security-domain>
            </security-domains>
        </subsystem>
    </profile>
</server>
JBoss AS7 bundles various PicketBox (underlying security capability) LoginModules, as well as various PicketLink (federated trust security capability) LoginModules.
Please refer to the LoginModule documentation directly for complete configuration details, however a couple will be provided as example here.
Simple users/roles properties files on the classpath:
<login-module code="UsersRoles" flag="required">
    <module-option name="usersProperties" value="users.properties"/>
    <module-option name="rolesProperties" value="roles.properties"/>
</login-module>
Security Token Service validation:
<login-module code="org.picketlink.identity.federation.core.wstrust.auth.STSValidatingLoginModule" flag="required">
    <module-option name="configFile" value="../standalone/configuration/sts-client.properties"/>
    <module-option name="useOptionsCredentials" value="true"/>
</login-module>
Quickstarts
The SwitchYard distribution contains security examples in the form of quickstart demos:
-
policy-security-basic: This quickstart exposes a bean service through a soap binding. Confidentiality is provided via SSL, and client authentication via a HTTP Basic Authorization header. See the Readme.md file for details.
-
policy-security-cert: This quickstart exposes a bean service through a soap binding. Confidentiality is provided via SSL, and client authentication via an X509 Certificate. See the Readme.md file for details.
-
policy-security-saml: This quickstart exposes a bean service through a soap binding. Confidentiality is provided via SSL, and client authentication via a SAML assertion in the form of a token retrieved from PicketLink STS. See the Readme.md file for details.
Tooling
Forge
SwitchYard integrates with Seam Forge to provide a set of rapid application development tools for service-oriented applications. Please consult the Getting Started guide for information on how to install Forge and the SwitchYard extensions to Forge.
Creating a Project
The first thing you'll want to do with Forge is create a new project. This can be done inside the Forge shell using the new-project command.
switchyard$ forge
    _____
   |  ___|__  _ __ __ _  ___
   | |_ / _ \| `__/ _` |/ _ \  \\
   |  _| (_) | | | (_| |  __/  //
   |_|  \___/|_|  \__, |\___|
                   |___/

[no project] switchyard $ new-project --named syApp --topLevelPackage org.switchyard.examples.forge
 ? Use [/private/tmp/switchyard/syApp] as project directory? [Y/n]
***SUCCESS*** Created project [syApp] in new working directory [/private/tmp/switchyard/syApp]
At this point, you have an empty application with a few Maven facets installed. What's a facet you ask? Read on ....
Facets
Facets add capabilities to an application and to the forge environment itself. This allows SwitchYard to add dependencies to your application's pom based on the functionality you will be using, instead of sticking every possible SwitchYard dependency in the application by default. Facets are also used to add commands specific to SwitchYard itself and components which you will be using in your application. The following facets are currently available:
-
switchyard - core set of commands and dependencies for the SwitchYard runtime
-
switchyard.bean - commands and dependencies for Bean component services
-
switchyard.bpm - commands and dependencies for BPM component services
-
switchyard.rules - commands and dependencies for Rules component services
-
switchyard.soap - commands and dependencies for SOAP gateway bindings
-
switchyard.camel - commands and dependencies for Camel services and gateway bindings
-
switchyard.rest - commands and dependencies for RESTEasy gateway bindings
-
switchyard.http - commands and dependencies for HTTP gateway bindings
Installing a facet can be done directly in the shell using the install-facet command.
[syapp] syapp $ project install-facet switchyard.soap
***SUCCESS*** Installed [switchyard.soap] successfully.
Wrote /tmp/syapp/pom.xml
Commands
The following SwitchYard commands are available in Forge (grouped by facet).
switchyard
-
switchyard show-config : displays the current state of your application's configuration, including services, references, and bindings.
-
switchyard promote-service : promotes an internal application-scoped service to be visible to other applications.
-
switchyard promote-reference : promotes an internal application-scoped reference so that it can be mapped to services provided in other applications.
-
switchyard create-service-test : create a new unit test for a service.
-
switchyard get-version : returns the version of SwitchYard used by the application.
-
switchyard trace-messages : enables message tracing at runtime - all messages will be logged.
-
switchyard import-artifacts : add a dependency on a service artifact module to the application's configuration
-
switchyard add-reference : adds a reference to a service implementation; particularly useful for service types which do not autogenerate references (Camel, BPM, BPEL).
switchyard.bean
-
bean-service create : creates a new CDI Bean service, consisting of a service interface and implementation class.
switchyard.bpm
-
bpm-service create : creates a new BPM service, consisting of a service interface and implementation class.
switchyard.rules
-
rules-service create : creates a new Rules service, consisting of a service interface and implementation class.
switchyard.camel
-
camel-service create : creates a new XML or Java DSL Camel route.
-
camel-binding bind-service : binds a service using a Camel endpoint URI.
-
camel-binding bind-reference : binds a reference using a Camel endpoint URI.
switchyard.soap
-
soap-binding bind-service : binds a service to a SOAP endpoint.
-
soap-binding bind-reference : binds a reference to a SOAP endpoint.
switchyard.rest
-
rest-binding bind-service : binds a service to a RESTEasy endpoint.
-
rest-binding bind-reference : binds a reference to a RESTEasy endpoint.
switchyard.http
-
http-binding bind-service : binds a service to a HTTP endpoint.
-
http-binding bind-reference : binds a reference to a HTTP endpoint.
Eclipse
Installation
Please refer to Installing Eclipse Tooling for details on installing the SwitchYard Eclipse tooling.
Features
The SwitchYard Eclipse tooling provides the following features:
-
Creation of SwitchYard projects.
-
Adding SwitchYard capabilities to existing Maven based Eclipse projects.
-
Configuration of SwitchYard capabilities (i.e. runtime component dependencies; e.g. SOAP, BPM, Camel, etc.).
-
A graphical editor for editing SwitchYard application configuration (i.e. switchyard.xml), which provides the following features:
-
Creation and configuration of components, services and references.
-
Component service/reference promotion and configuration of gateway bindings.
-
Creation of implementation skeletons for new service components (e.g. bean classes, BPMN2 files, DRL files, etc.).
-
Creation of unit test skeletons for services.
-
Configuration of message transformers, including creation of implementation skeletons for message transformers (e.g. XSL, Java, etc.).
-
Creation of Artifact references.
-
-
Java2WSDL
-
XML catalog entries for SwitchYard configuration schema.
-
m2eclipse integration supporting the SwitchYard Maven plugin (org.switchyard:switchyard-plugin).
-
Support for workspace deployment of SwitchYard projects.
Quick Start
Please refer the tooling quick start for a brief introduction to the tooling.
Administration Console
Overview
The SwitchYard management console is integrated with the standard JBoss AS management console and provides a read-only view of the applications and services deployed to the SwitchYard runtime, as well as a view of various runtime metrics.
This functionality will be extended in the future to provide access for configuring and monitoring SwitchYard applications and services.
Runtime View
SwitchYard provides page for viewing message metrics for the SwitchYard runtime and individual services. These metrics consist of:
-
Message count: total, success, failed
-
Processing time: total, min., avg., max.

Profile View
SwitchYard contributes a number of pages for viewing details about the system. The SwitchYard section of the navigator provides access to the following:
-
Applications - SwitchYard applications deployed on the system.
-
Services - Services exposed by SwitchYard applications.
-
Artifact References - Artifact references used by SwitchYard applications.
-
System - System details, including installed runtime components.
Clicking on one of the items listed under any section will cause its details to be displayed in the content panel to the right of the navigator.
Applications
Clicking the Applications item in the navigator will open the application details in the content panel. This panel displays all the applications deployed to the system. Selecting a particular application will populate the Application Details section below. Details are provided for services, artifact references and transformers.

Services Tab
The Services tab displays information about the services deployed by the application. This information includes the services exported by the application and the components used to implement the services.
The Services table displays the services exported by the application. The table provides the following details:
-
Name - The name of the service.
-
Promoted Service - The name of the component service providing the implementation for the service.
Clicking on an item in the Name column will load the service details for the selected service. Clicking on an item in the Promoted Service column will highlight the component used to implement the service in the Component Services table.
The Component Services table displays the components of which the application is comprised. This table provides the following details:
-
Name - The name of the component.
-
Interface - The interface implemented by the component.
-
Implementation - Provides a link for viewing the implementation details of the component.
Clicking on an item in the Implementation column will open a dialog detailing the component's implementation.
The Implementation dialog provides the following information:
-
The technology used to implement the component (e.g. Camel).
-
A list of references required by the component.
-
The raw configuration for the implementation.
Artifact References Tab
The Artifact References tab provides information about the artifacts referenced by the application and is comprised of a table providing the following details:
-
Name - The name of the referenced artifact.
-
URL - The source location of the artifact.
Clicking on an item in the table will navigate to the Artifact References page.
Transformers Tab
The Transformers tab provides information about the transformers deployed by the application and is comprised of a table providing the following details:
-
From - The from type supported by the transformer.
-
To - The to type supported by the transformer.
-
Type - The implementation technology used by the transformer (e.g. Java, XSLT, etc.).
Services
Clicking on the Services item in the navigator will open the service details in the content panel. This panel displays all services deployed to the system. Selecting a specific service will populate the Service Details section below. Details displayed include:
-
Application - The application providing the service.
-
Interface - The interface provided by the service.
-
Promoted Service - The component used to implement the service.
-
Gateway Details - Details about the gateways provided for accessing the service.
The Gateway Details table provides the following information for each of the gateways provided for the service:
-
Type - The type of gateway (e.g. SOAP, HornetQ, etc.).
-
Configuration - Provides a link for viewing the configuration details of the gateway.
Clicking on an item in the Configuration column of the Gateways table opens a dialog displaying the raw configuration for the gateway.

Artifact References
Clicking on the Artifact References item in the navigator will open the artifact references details in the content panel. This panel displays all artifacts referenced by applications deployed to the system. Selecting a specific artifact reference will populate the Applications Using Artifact table below. Selecting an application in the applications table will navigate to the Applications page.

Runtime Details
The system details page is the default page of the console. This page displays information pertaining to the SwitchYard system.
This page displays the version of the SwitchYard runtime, along with a list of installed components. Selecting a component will populate the Component Details section below, which displays:
-
Name - The component name, e.g. SOAP, Camel.
-
Type - The component type, e.g. soap, camel. (The type is the suffix used within switchyard.xml identifying component specific elements, e.g. binding.soap, implementation.camel.)
-
A section providing component specific details. For most components, this section details any configurable properties and their current settings.

BPEL Console
The BPEL console can be deployed to SwitchYard through its installer since SwitchYard-0.4 version.
Overview
This section provides an overview of the BPEL Console. The console provides the ability to view:
-
The process definitions deployed to the BPEL engine
-
The process instances executing in the BPEL engine
-
The execution history of a process
-
The history instances query
Installation
You could either install the BPEL console from the Installer script
or
you can just simply copy the switchyard-bpel-console.war folder and switchyard-bpel-console-server.war from the Tools distribution into the $Switchyard/standalone/deployments/ folder. Remember that you will need to add a marker file named "switchyard-bpel-console.war.dodeploy" in the deployments folder as well to trigger the deployment.
Because of this issue (https://issues.jboss.org/browse/RIFTSAW-391), we used the exploded war of the switchyard-bpel-console as the workaround.
UI usage
The detailed UI usage can be found at: http://docs.jboss.org/riftsaw/releases/2.3.0.Final/userguide/html_single/#d0e40